As seen at the Sketches for you blog! It's going to be awesome!!!! read below and then head on over to sign up!
Hello friends.....we proudly announce the BACK TO SCHOOL contest
that will start SEPTEMBER 10TH untill SEPTEMBER 30TH.
There will be lots of CHALLENGES and SKETCHES... with DT prizes...RAK's and
at the end of this contest there will be a 15 dollar certificate and for now a surprise PRIZE!!
We have a 1st and 2nd place winner.
And the greatest news is that we have two fabulous Guest Designers!
First we have Cherie Averill from Sassy LIL sketches..which are awesome sketches to use!
And we are also proud to announce NIKKI SIVILS....We are so glad we have such a great designer and
scrapbooker on our site....both will provide us with a sketch!!!
THANKS ladies to take the time to be on our site and provide us with a awesome sketch and
inspiration.
I also want to thank my DT Michelle...she was the one for this idea and she coordinate this!! Thanks for
your work.
pre challenges will be posted on september 8th......
so stay tuned for some awesome work and visit our site:
http://sketchesforyou.ning.com/
WE WELCOME YOU!!!!!!!!!!!

Tuesday, August 31, 2010
The winner of the Goodbye Summer, Hello Fall Blog hop is...
Lucky number 9 as picked by the random number generator.
Judy!!!
Judy please Email me with your address so I can send you your prize. Thank you everyone for participating!!!
Judy!!!
Judy please Email me with your address so I can send you your prize. Thank you everyone for participating!!!
Sunday, August 29, 2010
Paper strips
For those of you looking for the Goodbye Summer Hello Fall!blog hop, scroll down to the post below this one.
Paper strips can be an effective way to highlight a photo. In this case, I made a matte out of paper strips. It's easy to do. I used my cricut to cut two of the same shape. You could also use a stencil or circle cutter...or just cut two rectangles or squares of the same size. Next, layer the two shapes together so that all sides match, then use you paper trimmer to cut strips at even increments. You can then easily piece together alternate colors as you adhere them to the page in the shape of your photo matte.
 I used an older Sketchy Thursday's sketch for this page. For the background below the matte, I spritzed glimmer mist in moonlight and frost. The main inspiration for this page were these cute die cuts which I received in a Club CK swap. I immediately knew I wanted to use them with these photos of my son's first experiences with snow. For added interest, I used 3-d adhesive on some of the letters and on the snowflake.
If you try a page with paper strips, you can submit it over at Scrapwhispers.There are other inspirational ideas there to help you use up leftover paper strips in your stash.
Paper strips can be an effective way to highlight a photo. In this case, I made a matte out of paper strips. It's easy to do. I used my cricut to cut two of the same shape. You could also use a stencil or circle cutter...or just cut two rectangles or squares of the same size. Next, layer the two shapes together so that all sides match, then use you paper trimmer to cut strips at even increments. You can then easily piece together alternate colors as you adhere them to the page in the shape of your photo matte.

If you try a page with paper strips, you can submit it over at Scrapwhispers.There are other inspirational ideas there to help you use up leftover paper strips in your stash.
Thursday, August 26, 2010
Goodbye Summer! Hello Fall!
Welcome to the “Goodbye Summer, Hello Fall!” Blog Hop, hosted by a talented group of ladies from {Club CK}. If you did not arrive here from Toree's blog, please go to the beginning of the hop at Virtually Froggy and follow the blog hop in order. By following the blog hop from beginning to end you will collect words to a secret phrase which will make you eligible for the grand prize. The details for grand-prize entry are posted at the start of the blog hop. You won't want to miss it!
Here is list of the blogs you will be touring in order:
Stephanie (start here)
Amanda
Adele
Toree
Christy ( you are here)
Veronica ( visit here next!)
Janice
Michelle
Jen
Maribeth
Megan
Tammy
Natalie
Amy
Jennifer
Annie
Quite honestly, Summer is my least favorite time of year. I have always lived where it is really hot and humid. So I am always looking forward to fall. A lot of good things happen for me in the fall. I met and married my husband in the Fall. I was also born in the fall.So fall colors are a staple in my scrapbook pages. I also love how Fall colors can be very masculine. I thought that the Basic Grey Granola line would be perfect in color for these photos of my husband and the best man at our wedding. They had a floral accent which would be great for our wedding album while they set a great tone for the page.

I don't know about you, but I am always wanting to learn or try something new. I honestly don't have a lot of time or money for scrapbook classes, so I love finding things on the internet. One of my Club CK peeps posted a link to a great, free class on Basic grey's website. You can do the same project with any paper of your choosing. I obviously chose BG granola. I also substituted a BG stamp in place of her heart cutout.

And now...what would a blog hop be without blog candy! I have a little for you.

For a chance to win, simply become a follower and leave me a little comment to tell me that you are. Thank you for stopping by. I hope you liked my project and feel inspired to try out something new.So pop on over to Veronica's Blog! Enjoy the rest of the hop!
P.S. my secret word is Autumn.
Wednesday, August 25, 2010
You Have...
For awhile now, I have been wanting to do a page about my son's characteristics. We always tell him things like " you have mommy's nose and Daddy's eyes." So, while we were waiting in the car for his swim lessons, I snapped off some photos of his hands, feet, and other features. I created this page based on a project at Big Picture Scrapbooking.

I used Some glimmer mist in tiger lily and patina to splatter the background onto the white cardstock. The flowers are prima's e-line as are the blue jewels. The patterned papers are crate paper and cosmo cricket. I used a very old fiskars punch. For the title, I used black cardstock to add a shadow effect and to highlight it. I journaled about his personality traits and who he gets some of those from and then on the photos, I added journal strips about where his physical characteristics came from.


I used Some glimmer mist in tiger lily and patina to splatter the background onto the white cardstock. The flowers are prima's e-line as are the blue jewels. The patterned papers are crate paper and cosmo cricket. I used a very old fiskars punch. For the title, I used black cardstock to add a shadow effect and to highlight it. I journaled about his personality traits and who he gets some of those from and then on the photos, I added journal strips about where his physical characteristics came from.

Tuesday, August 24, 2010
Just one more day to...
The Goodbye Summer, hello Fall Blog hop. Join me as a group of wonderful ladies share their ideas and inspiration. Stay tuned...the hop starts on Thursday and goes through the weekend.
The Longest Day


Pagerize this!
There is a new challenge over at Scrap Our stash. It's a scraplift challenge...and I love scraplifts. I find they are a great way to make a quick page and maybe learn a thing or two along the way.
August's scraplift is this page by Kathy:

I was instantly inspired by the flow of Kathy's page. I felt the design would work perfectly with photos I had taken of my son making wishes on dandelions. Having a boy, it's often hard to use paper or items with floral designs. I had some paper from a June kit with flowers all over it. I loved the bright happy feel of the paper and felt that I could use it on this layout since the dandelions were part of the main focus. If I had used green paper, I think the page might have had a more spring feel. I chose the dark orange cardstock because I felt it gave the page a more masculine tone and a more summer feeling color palette. Orange, coincidentally, is one of those colors I don't use often. I have a lot of it in my stash. If you have a color like that in your stash, try finding way to use it as an accent color to other papers, as I did here.

I cut the title on my cricut using a font called "a red bucket." Since the paper had glitter accents, I added diamond, fruit punch and orange peel stickles to the title and the doodlebug "jellishments." I liked the bracket on Kathy's page, but chose to make mine out of vellum. This helped tone down the loud print. The lady bug ribbon is cute world by Autumn leaves. It's one of those impulse buys which each and everyone of us tends to have. I am so glad I could find a use for it here.The green ribbon is Stampin' up.
There are some frugal touches to my page that many of you might find useful. The first being the white photo mattes. The photo of the flower printed perfectly with a white edge around it. I chose to simply crop the photo with some of that white border remaining. This is both a time and paper saver.The mattes for the photos of my son are made from cricut scrap pieces.
 You would never know that there were cut outs behind the pictures. I do this to save on paper. For those pieces I don't use for mattes, I cut them down into strip for borders or journal strips.
 The flowers were part of a "baddies" swap I did with a fellow scrapbooker. She just did not know how to use them. While they were cute and the flocked aspect of them was nice, they were a little worn looking and dull. I used my stickles on them to change their color and dress them up to match the page.


August's scraplift is this page by Kathy:

I was instantly inspired by the flow of Kathy's page. I felt the design would work perfectly with photos I had taken of my son making wishes on dandelions. Having a boy, it's often hard to use paper or items with floral designs. I had some paper from a June kit with flowers all over it. I loved the bright happy feel of the paper and felt that I could use it on this layout since the dandelions were part of the main focus. If I had used green paper, I think the page might have had a more spring feel. I chose the dark orange cardstock because I felt it gave the page a more masculine tone and a more summer feeling color palette. Orange, coincidentally, is one of those colors I don't use often. I have a lot of it in my stash. If you have a color like that in your stash, try finding way to use it as an accent color to other papers, as I did here.

I cut the title on my cricut using a font called "a red bucket." Since the paper had glitter accents, I added diamond, fruit punch and orange peel stickles to the title and the doodlebug "jellishments." I liked the bracket on Kathy's page, but chose to make mine out of vellum. This helped tone down the loud print. The lady bug ribbon is cute world by Autumn leaves. It's one of those impulse buys which each and everyone of us tends to have. I am so glad I could find a use for it here.The green ribbon is Stampin' up.


Before

after
try using stickles in coordinating colors. I used the orange peel on the yellow and the fruit punch on the purple flower.
Since this was a page about my son making wishes and I did not know what his wishes were, I chose a simple quote which I felt reflected the page. It reads: " Our inventions mirror our secret wishes." When you are unsure of journaling or need a little extra feeling to a page, quotes are a simple solution.
Now, let's see if you can Pagerize Kathy's page. We'd love to see your take over at Scrap our Stash!
Saturday, August 21, 2010
Blog Candy alert!
Scrapstreet is having a gigantic giveaway! If you've never heard of scrapstreet, they are a wonderful on-line magazine for scrapbookers. i invite you to check out both their blog and their magazine.


Friday, August 20, 2010
It Girl
Sometimes, it's hard to use pink when you have a boy. My only baby girl is my little cat, Sweetpea. So when I get the chance, I highlight her as a subject in the photo and go crazy with girly colors and bling!
 For It girl, I chose to use a black pearlized card stock for the background and white pearlized cardstock for the mattes. DCWV's All dressed up collection was the perfect patterned paper. I layered it over ripped pink cardstock and inked everything with ruby satin colorbox ink. The left page is a sketch from Sketches for you. I painted some chipboard letters pink and used fruit punch stickles on the top. Painting your stash is a great way to make it work for you. Don't be afraid to be versatile. The word girl are colorbox punch outs which I used Glossy accents over. Glossy accents provide wonderful dimension and can easily update older stickers or die cuts. I used Making memories 5th avenue trim and sewed small pearl beads onto it.
 The brads are K and company, Sassafrass and Basic grey(with stickles on them). The crown and Feather are basic grey rub ons to which I added stickles and perfect pearls. The journal spot is a Fancy pants rub on in just that perfect shade of pink. So while my son is in the picture, I can add lots of fun pink and girly accents by focusing on my cat.
Submitted to : Sketches for you
Scrapfit


Submitted to : Sketches for you
Scrapfit
I was a Gallery Highlight!
I am so excited that I just had to tell someone... one of my pages was featured as a Gallery highlight at Club CK. I have recently been working on some pages for my wedding album. For this page, I had used a sketch from Design Team member Brenda at Sketches for You. I made a square mask and used meadow glimmer mist to create a subtle background. I fussy cut Basic Grey Porcelain paper to create a scrolled border. I hand cut the hearts based on the shape of the pink Heide Swapp mirrors used on the page. I then used my bazzill stitch template to hand stitch the flourish.


There are a lot of great ideas in the Gallery highlights article for your pages. Some I hope to try myself.
Thursday, August 19, 2010
Using a Speech Bubble
Recently, I came across a a challenge at ScrapWhispers to use a thought bubble. At first, I was a little unsure. However, when I printed the photos of the sea lions, I could just see the little girl sea lion asking my son if he would play. These Sea lions are in quarantine b/c they are new to the place my husband works at. He brought us to see them and they immediately perked up when they saw my son. It was as if they knew he was a little kid just like them. They walked back and forth...following him as he walked in front of their enclosure. When it was time to go, My son started protesting and then the little boy sea lion started barking at me as if to say " no...we aren't done playing yet!". It was all just so cute.

I wanted some fun paper for this page, so I chose Sassafrass. All of the paper is Sassafrass except for a tiny bit of Fancy pants where I journaled and matted the photos. For the thought bubble, I used a chipboard sticker which I mounted on chipboard and cut out. The brads(except for the decorative ones) and the buttons are Basic grey. I inked the edges of the buttons and the papers with Autumn leaves red ink and colorbok inks. I love the bright Sassafrass in stitches flowers for this page. I did a little bit of handstitching as a small accent with some orange floss.There is an acrylic arrow just visible under the orange page protector. I wanted to keep it neutral but wanted the eye to go from the title to the journaling.This is sketch 213 from Scrapbook challenges.

I wanted some fun paper for this page, so I chose Sassafrass. All of the paper is Sassafrass except for a tiny bit of Fancy pants where I journaled and matted the photos. For the thought bubble, I used a chipboard sticker which I mounted on chipboard and cut out. The brads(except for the decorative ones) and the buttons are Basic grey. I inked the edges of the buttons and the papers with Autumn leaves red ink and colorbok inks. I love the bright Sassafrass in stitches flowers for this page. I did a little bit of handstitching as a small accent with some orange floss.There is an acrylic arrow just visible under the orange page protector. I wanted to keep it neutral but wanted the eye to go from the title to the journaling.This is sketch 213 from Scrapbook challenges.
Wednesday, August 18, 2010
Blog candy alert!
I just saw some blog candy on a fellow DT's blog! So if you want a chance at a great package of candy, head on over to Dannie's creative Outlet.

For another big candy bonanza, check out Beadz anniversary giveaway worth over $200 of scrappy goodness!

For another big candy bonanza, check out Beadz anniversary giveaway worth over $200 of scrappy goodness!

jump for Joy: a recipe challenge
Recipe challenge can be...well, a challenge. That is the fun in them though...and they are a great way to use up you stash. Frosted currently has one underway. As I perused the ingredients list, I realized that the page I had just made using Scrapbook challenges sketch #212 fit the bill.

Lets see: bird(check),ribbon(check), felt flowers( that marks of two ingredients),buttons(check), and glitter(in the form of stickles). I believe that covers it! 6 ingredients! YES! There were 10 to choose from. perhaps you should head on over and see the list for yourself.
Meanwhile, I am a firm believer in combining challenges. So going through my challenge notebook, I realize I can also submit this page to:
Big picture Scrapbooking for the "I Live" challenge today
Scrapbook Challenges August color challenge
Club Creating keepsakes Scrap your stacks challenge
Sketches for you: Brenda's Fall colors challenge
Challenge masters:go green inspiration challenge
being organized means being able to track and submit my work for a variety of challenges while still getting lots of pages done. I find I am creating more a lot more. So go get organized and see just what you can come up with!
Using a circle template
Club creating keepsakes has proven to be a great source of tips and information. I learned about one of my best and cheapest tools from a club ck peep. I always liked hand stitching, but had never tried it. I thought it would be to hard or take up too much time. When I learned about using plastic canvas as a template, all of that changed. As you can see from this photo of a recent layout, nice even circle are a breeze!

I have 2 templates. One is a rectangle and one is a circle. I purchased them for under a dollar in the plastic canvas and sewing section of my local craft store. I can use them not only for stitching, but also for brads or anything else I want to put on my page in a nice even manner. You simply lay the canvas template down, and use a pencil to mark where your brad(or in this case, punched circle) will go.
 As you can see, it is easy to keep a nice even line. Because you can see through the canvas,You can easily change the size of the circle you want...simple select a circle and then follow the squares around that circle as you mark with your pencil.

 It really makes stitching so easy!
For flourishes or designs, I recommend the Bazzill In Stitches templates.They make adding a little stitched flair to your pages so easy.

I will say, I don't find the need to use the ones for words or letters. I simply hand draw, use a die cut letter or use a stencil as a guide for my letters...then I use the paper piercer to poke the holes and stitch.
If you do hand stitch on a page, practical scrappers is having a stitch challenge this week!
***Updated: the Jeep LO was featured as a Practical Scrappers top 3!
I used the template to align the brads as well as to stitch the circles. This Layout was completed for sketches for you.The paper is Creative imaginations. The green brads are Basic grey. The star brads are Making Memories Just chillin' line.


Paper used is Cosmo cricket Boyfriend collection. this is a Let's Scrap Sketch and part of the club ck one hour challenge: use hole punched circles.
For stitching, I usually mark every other hole. I then go back with a paper piercer to pre-make the holes before I stitch. 
For flourishes or designs, I recommend the Bazzill In Stitches templates.They make adding a little stitched flair to your pages so easy.

The paper is fussy cut Basic Grey. I also hand cut the stars from the porcelain collection. I used Heide Swapp mirror hearts.
If you do hand stitch on a page, practical scrappers is having a stitch challenge this week!
***Updated: the Jeep LO was featured as a Practical Scrappers top 3!
Sunday, August 15, 2010
Splashtastic
I love when my son poses for me. I am so camera crazy that often he and DH get tired of me taking their photos. Yesterday, we took DS to the pool. When he saw me with my camera, he went crazy...splashing and yelling to see if I caught the shot. These photos were taken with my little canon powershot a590. Since they are fun photos, I wanted some fun paper to go along with them. I chose My Mind's Eye's Laundry line: coastal collection. I loved the shimmery feel of the papers and I thought the colors matched the summer feel of the photos.
 To create the title, I used my cricut to cut CK's Far out font from some card stock. I added waterfall stickles so it would match the shimmery papers.
I had completed this for the My Mind's Eye #14 blog challenge and loved the sketch they used so much, that I made page 2 to match. It's more simple than page one. I only added some buttons which had a slight wave pattern on them. I chose to journal on both pages on vellum strips.


I had completed this for the My Mind's Eye #14 blog challenge and loved the sketch they used so much, that I made page 2 to match. It's more simple than page one. I only added some buttons which had a slight wave pattern on them. I chose to journal on both pages on vellum strips.

Saturday, August 14, 2010
Ella's Inspiration Chain
Do you remember that game called telephone...the one kids play a lot? Some people call is Chinese Whispers. In the case of Ella Publishing co., they call it an inspiration chain. Instead of a word or phrase, you take someone 's project and scraplift it, then pass on your version and so on, until you reach the last person. Ella did one recently, and I made a version based on the last page in that chain.
This was the last page in that chain. This digi page was made by Katrina Simeck.

I loved her simple design and wanted to replicate that on my page. Mine of course is not a digi, but a traditional creation. I used DCWV Natural stack card stock for my base. I cut a square out of the back so I can get more out of the paper. It was easy to do with my purple cows free style mouse.
 The photo is one I took when I was experimenting with sun light. I am looking up through the branches of a Royal Poinciana tree. I liked the way the Fancy pants harmony paper complemented the colors of the photo. I used a quote from DCWV Nature and inspiration vellum quote stack. I accented the quote with a Fancy pants felt flourish. On the lower left corner, I fussy cut 3 small circles from some Crate Paper pink plum paper. I stitched over them with Bazzill floss.

All in all, a simple page and one I hope to use as the ending to one of my summer albums.
This was the last page in that chain. This digi page was made by Katrina Simeck.

I loved her simple design and wanted to replicate that on my page. Mine of course is not a digi, but a traditional creation. I used DCWV Natural stack card stock for my base. I cut a square out of the back so I can get more out of the paper. It was easy to do with my purple cows free style mouse.


All in all, a simple page and one I hope to use as the ending to one of my summer albums.
Friday, August 13, 2010
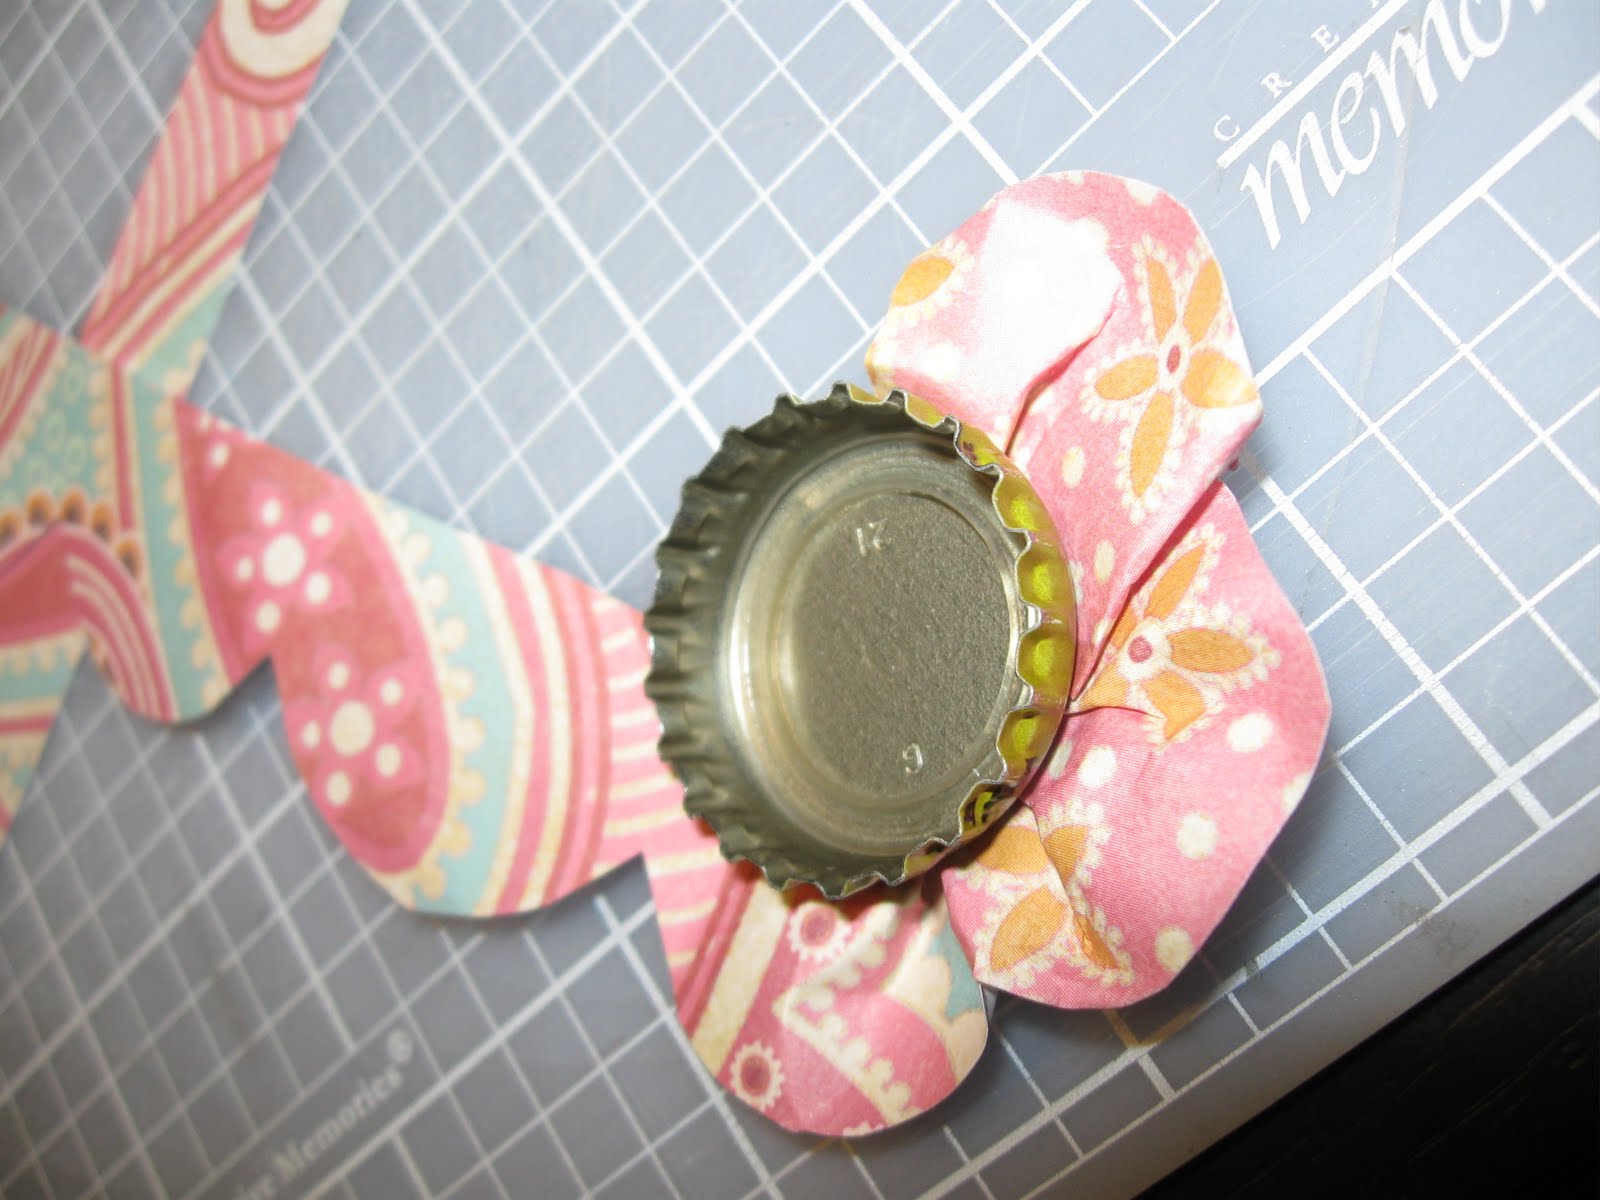
Frugal Friday- Bottle Cap Flowers.
A little while back, my son got a kit about using bottle caps to make craft projects. You can make a lot of neat things with bottle caps. In this "capsters" craft kit, they placed images, beads and anything you could think of. This got me to thinking of all the ways I could use bottle caps in scrapbooking. If you don't have bottle caps at home, that's ok. Craft stores sell them just for this purpose. You can also go into a restaurant and ask for them from their bar. they are usually willing to oblige. Just make sure you wash them and dry them well!
So here is what you will need: bottle caps, glossy accents(or a similar product), scraps of ribbon or paper, beads or anything else you wish to put inside your bottle cap, adhesive( I prefer glue dots for this project). If you want a scalloped daisy style flower...you will need a template (or if paper a punch) for scallops.Otherwise, strips of paper work fine. You can also use ribbon, crepe paper, felt, cloth,etc. *note, stiff paper may be difficult to work with. try this with a lighter weight paper first. I used K and Company paper for my example.

To get started, cut your scalloped strip of paper. Place a glue dot on the bottom of the cap and then begin folding/pleating the paper as you wind your way around the bottom of the cap. Apply adhesive as you go to keep your pleats in place.

Once you are finished, pour beads into the bottle cap or place whatever item you wish to go there. Then, fill the cap with the glossy accents. You will want to fill the cap to the top. This will help reduce any sharp edges the camp may have. You will need to let it dry fully before using it on your page or card.
If you wish, you can use a strip of paper or ribbon in place of the scalloped paper. The same principle applies...just keep adding glue and folding the paper or ribbon as desired. A second "ring" or set of petals can be applied under the first if you want more dimension.

This is a great way to recycle while using up scraps. You end up with a very unique flower.

So here is what you will need: bottle caps, glossy accents(or a similar product), scraps of ribbon or paper, beads or anything else you wish to put inside your bottle cap, adhesive( I prefer glue dots for this project). If you want a scalloped daisy style flower...you will need a template (or if paper a punch) for scallops.Otherwise, strips of paper work fine. You can also use ribbon, crepe paper, felt, cloth,etc. *note, stiff paper may be difficult to work with. try this with a lighter weight paper first. I used K and Company paper for my example.

To get started, cut your scalloped strip of paper. Place a glue dot on the bottom of the cap and then begin folding/pleating the paper as you wind your way around the bottom of the cap. Apply adhesive as you go to keep your pleats in place.
Once you are finished, pour beads into the bottle cap or place whatever item you wish to go there. Then, fill the cap with the glossy accents. You will want to fill the cap to the top. This will help reduce any sharp edges the camp may have. You will need to let it dry fully before using it on your page or card.
If you wish, you can use a strip of paper or ribbon in place of the scalloped paper. The same principle applies...just keep adding glue and folding the paper or ribbon as desired. A second "ring" or set of petals can be applied under the first if you want more dimension.

This is a great way to recycle while using up scraps. You end up with a very unique flower.

Tuesday, August 10, 2010
Capturing A Hummingbird
I had never seen a live hummingbird until recent years. Now I am lucky enough to see them quite frequently. The community which we recently moved to seems to support a thriving population. I have long wished to capture them on film. It's a daunting task considering that they won't come too close and fly at incredible speeds. For whatever reason, on this particular day, one hummingbird decided to hang out on our patio. Not to mention, that she was gracious enough to allow me to come within a few feet of her. I saw her flitting about, teasing our cat with her aerial acrobatics, and thought she would fly away as soon as I came out the front door with my camera. She just flew around...watching me. I snapped furiously...and though the photos are not of the greatest composition, I am so happy that I captured her photo.

I chose DCWV Far eastern stack paper for its red flowers...since hummingbirds love them so much. I fussy cut some of the branches and blooms.The background card stock is also DCWV. Since it had an oriental feel to the paper, I rubbed platinum colorbox ink on a red strip of card stock. I added a gold brocade Crate Paper trim. This is Sketchy Thursday's 8-5-10 sketch.
The above is page two of the layout. I completed page one during a Club CK one hour challenge. I used part of a chipboard stack remnant to create a frame. I inked it with Autumn Leaves red ink and colorbox Platinum. The alphabet has been in my stash for some time. I don't even remember who makes it. To update it and add dimension, I used glossy accents over the letters. The brads are K and company.

Monday, August 9, 2010
Sewing on the Edge
I love handstitching. Quite honestly, I have yet to even pull out my sewing machine. I think getting that out of the closet would take longer than just handstitching on the page.LOL Sometimes, I want to sew right off the edge of the page. It really is far simpler than you might think.
I first start off with marking my holes. You can do this with a bazzill template. You can also use a piece of plastic canvas as a guide. Or, as in this case, you can draw it free hand. I used embellishments found in the Crate Paper Brook Collection kit as my inspiration. Take your paper piercer and punch the holes. When you get close to the edge, make sure to be very careful not to rip it.

 Make sure you don't pull too tightly as you can rip the paper or crimp it.

Continue stitching as normal.

It creates a wonderful effect on your page. Here is a close up of the edge.


I first start off with marking my holes. You can do this with a bazzill template. You can also use a piece of plastic canvas as a guide. Or, as in this case, you can draw it free hand. I used embellishments found in the Crate Paper Brook Collection kit as my inspiration. Take your paper piercer and punch the holes. When you get close to the edge, make sure to be very careful not to rip it.

This photo gives you an idea of how close to the edge you can get.
Start stitching away. You may wish to start a little ways from the edge of the page. That way, your knot won't hang off the back edge. When you get close to the edge. You will carefully loop your thread around the page edge and push the needle back through the hole.


Continue stitching as normal.

It creates a wonderful effect on your page. Here is a close up of the edge.

Handstitching has become a favorite way for me to add accents to my page. Sometimes I use a little:

and sometimes I use a lot:

With Rainbow Popcorn. I wanted to create the look of clouds on the top portion of the page. So I used a cloud stencil. I drew clouds all over the page, then used my paper piercer at intervals. It took awhile to stitch this page, but I feel it was worth it.
* Get the Buggy is Sketch Inspiration # 136, Sketches for you August SGOTM color challenge. Products used are Crate Paper Brooke Collection, K and Company Ancestry paper ribbon and a handmade rose.
*RainBow Popcorn is the sample for my August be Inspired project at Sketches for you. I used Sassafrass and DCWV papers. the ribbon is from the fabric store. The title is made with Colorbok Punch Out Alphas. I added Diamond stickles and glossy accents to the letters.
Don't forget...if you make a project with a flower, submit it to Scrap our Stash.
Saturday, August 7, 2010
My First Sketch!


I used my cricut to cut the title with "a red bucket" font. The journal spot is K and Company. I tore a cs border, used an old fiskars border punch on another shade of green, then added some ek success fiber. I fussy cut some K and Co. scalloped pp from the recycle green grass matte stack. I then added a cloud 9 design baby boy stitched sparkle sticker. I fussy cut the green flower from the DCWV all dressed up stack and added a brad. The little green flowers were part of a ribbon strip I got in a rak. I cut them apart and added a green pearl to each. I stamped dots with green moss colorbox ink and a pencil eraser.
I am really happy with how this turned out and now I think I can draw a sketch almost any time I would like to. To try your hand at this challenge, pop on over to Sketches for you.
Thursday, August 5, 2010
It's a blog candy shower!
It boggles the mind at how much blog candy is out there. here is a chance at some great stuff...but it ends on August 7th! So hurry on over to the Hovey Hut for the chance at a fantastic prize pack!!!


The Craft table Blogaversary candy
I have been crafting since I was a little girl. I started scrapbooking about 8 or so years ago. let's just say, that's when digitial cameras became more affordable and when my wonderful boy inspired me to chronicle our lives. Recently, I started blogging...and that's when i discovered blog candy.Can you tell I love blog candy? But then again, who doesn't? You know you want some? here is another goodie.

I know! Awesome prize, right?!?! Head on over to The Craft Table to learn how you get a chance to win it!

I know! Awesome prize, right?!?! Head on over to The Craft Table to learn how you get a chance to win it!
Imaginisce I-rock giveaway!
OMG! There is juts one fab giveaway after another this month. So here is another chance...pop on over to their blog for a chance to win! To be honest, I was on the fence about this tool.However, now that i see you can bling up your albums and personalize more things than just paper, i am really interested in an I -rock. Check out what they did to a leather album.


Subscribe to:
Posts (Atom)