Thursday, June 30, 2011

Top O' the Morning to you!

 Or good afternoon, or evening...or whatever time of day it is as you are reading this. I hope you are having a good one! I just had a minute or two to share a very belated St. Patty's day LO that I just made with items from my counterfeit kit. I know that June's kit is supposed to be all about summer. However, I realized I had some lovely greens in the kit and I am a bit behind in getting some of my photos scrapped ( because I take WAY too many photos). When I printed this photo of my son from St. Patrick's day, I knew the greens from my kit were perfect for it.
Pencil lines sketch 243
DMC floss
Colorbox ink-Olive
Studio G Stamp
Basic Grey brads
Making Memories - rub on alphas
Making Memories flowers and buttons
Making Memories chloe's closet leather frame ( cut)
Sassafrass border
Scenic Route PP

The matte that the photo is on is actually not a matte at all. I took two Making Memories journal spots, trimmed off the notebook edges and then glued them down together. There was a slight seam which I hid with a Sassafrass border and some buttons. I used the basic shape of this to influence the shape of the Patterned paper. The flowers and brads were not in my kit, but they went so well, so I used them anyway.
   This month has been hectic and I am sad that I did not get to play with my supplies as much as I wanted to. Here is wishing all of us who scrap a month of July full of me time and happiness! May we all get many pages done!!!

Tuesday, June 28, 2011

The Rainbow Connection

    Sometimes a song will just spin around and around in your head. For whatever reason, Kermit the frog singing " the rainbow Connection" popped into my skull every time I looked at these photos of my son with the food colouring. We were conducting an experiment for school. It really had nothing to do with colour. The experiment focused more on the properties of water and it's movement. The colour just facilitated our ability to see the movement of the water through the tubes. The idea was to produce a syphon effect and to get the water flowing between each container. The colours would mix and you would have this sort of rainbow between the curved tubes and the bowls. The photo in the lab manual was spectacular looking. Our experiment, well...less spectacular. We did get it to work though not as intensely as the lab manual suggested it would be. What we did have was another moment of mom and son sharing their love of science...a connection if you will. So that's where the title really took shape...the song, the rainbow of colours we used, and the connection between myself and my son. I guess you could say that Kermit was singing inside my head for a reason.
   I chose to use one of Scraphappy.org's 15 minute page idea for this. As usual, it took me longer than 15 minutes to complete it. It was more like 20-30. None-the-less, I find 15 minute page sketches quite satisfying and an overall sound way to get fast, but cool pages that I love. Initially, I had only wanted to use the Sassafrass paper, Cosmo cricket ribbon and various chipboard parts for the title. My son took one look at the page and said something to the effect of, " I know you taught me about white space, but that page is just too white. Add some more colour to it." So, taking his advice, I splattered a lot of glimmer mist all over the page. It produced some very happy non-white white space which seemed to please him quite a bit.
Sassafrass paper
Cosmo Criket ribbon
SEI inke blue ink(on paper edges0
glimmer mist- tiger lily, sapphire, meadow green and candy apple red
bread tage with Nerdy bird fussy cut rainbow dude from sassafrass
Inkadinkadoo bracket stamp in green paint with marker
Sassafrass chipboard alphas(rainbow)
American crafts minimarks rub on alphas on crate paper chipboard cloud
Maya Road william chipnpard ( connection)
Bic mark it in playful purple

  Page two was easy to produce. I simply extended the design over to the second page on the left. It truly was a 15 minute page...well, sort of. The journalling made it take longer than 15 minutes, but who is really counting, right? Overall, it's a simple two pager with a lot of pop. I am happy with the results and am now off to try for another quick page before my son wakes up for the day.

Monday, June 27, 2011

Soft Kitty, Warm Kitty

   If you watch the Big Bang Theory( one of our favourite shows) than you might recognize the little song. My husband suggested I use it for a page about our cats. It's one of the few times he has had an idea ( or interest in sharing one) for a scrapbook page. So of course, I obliged him. I chose a soft palette form my June Counterfeit kit.The pink and blue tones of the Sassafrass indie girl papers seemed the purrfect way to convey the warm snuggly feeling of my cat's napping.

Scraplift of "Love These Moments" By Kelly Noel
Sassafrass papers, pink glitter alpha, and paper whimsy flower
Basic Grey Brads
Colorbox Stucco ink.
  On both pages, I chose to use foam adhesive to lift parts of the patterned blocks from the paper. I had seen this on other pages before, and had loved the way it added dimension to the page. On the second page, I was struggling a bit with photo placement. I realized that cutting one of the photos in half made the page more interesting.
Sassafrass June Sketch challenge

I don't know about you, but photos of cats always make me smile. Now I am off, to hopefully use up more of that counterfeit kit. Seems like life keeps getting in the way of scrapbooking lately!


Saturday, June 25, 2011

Lunar Eclipse

  Sometimes we experience a wonderful moment in our lives but don't have a photo to document it. Last December, my son and I went outside in our Pj's, all wrapped up in blankets just so that we could witness the Lunar eclipse. The Eclipse itself was gorgeous. Unfortunately, I lack the skills and the camera equipment to properly photograph it. The next morning, my son drew a picture of the event so that I could still scrapbook about it. In some ways, the drawing is almost better than a photo. Not only does it preserve the moment, but it also shows how considerate my son is.

papers and brads from my June counterfeit kit:
pink paislee 365 degrees paper, making memroies poolside brads,
Maya road ribbon, brackets-American crafts forest thickers
items not from counterfeit kit: vellum, star brads ( doodlebug ?),
Making Memories noteworthy alphas, moon button, blue button
and ephemera from October Afternoon
Sassy lil Sketch 6-14-11

Friday, June 24, 2011

Frugal Friday Tip: DIY embossing folders


  Last November, I was very happy to add a Sizzix Texture Boutique to my arsenal of scrapbook tools. Of course, what would an embossing machine be without the embossing folders? Since I purchased the Texture Boutique, I began to slowly acquire a variety of folders. However,most days, my budget did not allow me to purchase more. So you can imagine that I was quite intrigued by the idea that I could make my own.  I had come across the photo of just such a handmade folder on Pinterest. The Photo led me to a blog post with directions. Mel, the owner of Mel Stampz blog, had shared, in detail, how she created an embossing folder out of recycled cereal boxes and mod podge. So the very next day, I went out to the craft store and purchased the mod podge so that I could get to work.
  Now while I do have access to quite a lot of cereal boxes, I chose instead to raid my stash for some sheets of chipboard. I had a whole pack of this thick chipboard that I had purchased at the craft store. I felt that it would be a bit heavier and longer lasting than the cereal box. Next, instead of cutting chipboard pieces, I used some of the precut ones I had in my stash. Warehouse sales and Manufacturer grab bags have left me with quite the variety of chipboard pieces. The precut pieces are also thick and durable, which in my mind, would translate to better impressions when I used them to emboss. 
   The folders were incredibly easy to make. I simply used my embossing folders as a template to mark out the size I would need on the chipboard sheet. Once that was done, I cut the sheet and set to work adhering the chipboard shapes. For my first folder, I chose some chipboard stars from the rusty pickle. I laid the stars out onto the chipboard sheet, then used a brush and mod podge to adhere them. I did go back and cover the whole thing with a layer of mod podge. Very little mod podge was needed. The hard part was waiting for an hour so that it could cure. While I waited, I made another embossing plate with chipboard hearts from Maya Road.
  Once the handmade embossing plates had cured and were dry, I next set about experimenting with a variety of sandwiches to use in my machine. I tried an extra sheet of the chipboard-cut down to size, a piece of craft foam, and also an old mouse pad. The results were very pleasing.

Handmade embossing folder made from Maya Road
chipbaord hearts, Mod podge, and a sheet of chipboard
The sandwich with the craft foam and the sandwich with the mouse pad produced the deepest embossed impressions on the paper. Some weights of paper worked better than others. I found a medium weight paper provided the best results. I also tried embossing pieces of soda can. I got a very light impressions which, though visible to the naked eye, did not photograph well. It seems that paper will work the best with these homemade embossing plates.
hand made embossing folder with rusty pickle stars,
mod podge and chipboard
I did try the recommendation of spritzing the paper with water prior to running it through the machine. I found however, that this caused the paper to stick to the hand made template. You can see the red fuzz it left behind on the star plate above. I believe mod podge does make a water proof sealer which may be worth looking into. All of the paper's I embossed were done without water though, except for the one. I tried it with Coredinations colour core card stock. Even with the water, the paper was so thick that a deep impression was not made. It does not even show well in the photo above. There was a slight impression on the star which showed through a little after I sanded it. I still recommend medium weight card stock.
  While the hand made templates do not emboss every type of paper, I can still see them as a useful tool and a money saver. I plan to make some more and may even attempt cutting my own shapes or designs to use. Meanwhile, I have plenty of extra precut chipboard shapes with which to work with.http://melstampz.blogspot.com/2009/07/free-hand-diy-cereal-box-cuttlebug.html

Wednesday, June 22, 2011

A Journey through Symbolism and Creative Discovery

   We all have one...the layout you sort of like but are not quite sure of. I sort of went a little( or a lot) artsy with this one and am still not quite sure what to think. In the end though, there is a lot of symbolism and meaning behind the page( mostly for me) and it's another page completed!There is a lot to learn about yourself, especially from those pages which you are not completely sure of.
  If you are wondering what my son is doing in this photo, he is working with some wooden pattern blocks for a math class.During part of the class, he deviated a bit from the recommended patterns in the books and began making his own design. I took the photo standing on a chair so I could get a nice overhead view. Initially, this page was going to be about our homeschool math classes which is why I chose this particular Sassafrass paper. However,  as I started journaling, it became more about my son's creativity. I had journaled on a scrap sheet of paper and so I was able to take the title directly from that.
Something old: Sassafrass paper
Maya road chipbaord butterflies
Paper Trunk balck alphas
Pink Paislee glitter alphas
Something New: Cosmos cricket chipboard- man with lightbulb
SEI Journal spot
Something borrowed: Page maps sketch
Doodled scallop border was inspired by a Fancy Pants stamp
Something Blue- Bic mark it in Blue Skies Blue
blue punched dots

   Since the Sassafrass paper was very busy, I struggled with how I wanted to use it with this photo. I chose white acrylic paint. It allowed part of the pattern to show through a bit while helping to tone the pattern down. it also represented to me the transparency of thought. I had just bought some Cosmo Cricket chipboard which had this wonderful image of a person with a light bulb coming out of their head.  It went perfectly with the theme of thought and imagination. To give the bulb a little more emphasis, I adhered it to an SEI journal spot which I felt gave it the appearance of a lit bulb. The black colour symbolizes the openness of the mind and of thought. The butterflies and sequins represent my son's creative ideas flowing outward. I "borrowed" the scalloped image that I drew with a marker. I had just seen a similar stamp by fancy pants in an on-line catalog. Since I did not own the stamp, I doodled it as best as I could. Covering it with glossy accents gave it a little more substance, as did the hole punched blue dots. There is a photo matte( though it may be hard to see). I stamped a black, cloth like image under the photo. I thought it could represent the fabric of our minds.
     I know that some of the symbolism is a little "out there" and not very obvious. What is important is that it was  fun to experiment, both with the idea of giving a deeper meaning to the page as well as with the physical page elements themselves. So even though I am not 100% completely satisfied with this page, I am completely satisfied with the steps I took to make it and what I learned about my Creative process along the way.

P.S. If you noticed the something borrowed, something blue, something old and something new notations in the caption under the photo, you may be wondering what those are for. It's the theme for Scrap Our Stash's June challenge. Interpret that phrase any way you would like for a page or project and submit it at Scrap our Stash for a chance to be a guest designer!

Friday, June 10, 2011

0001110101

   I have no clue as to what I may have said in the title's sequence of numbers. If you are not familiar with these types of number sequences, they are the language of computers. My son is sure getting curious as to how he might translate the way a computer speaks. So to that end, I bought a homeschool computer programming course for him last fall. I say it's for him, but truth be told, it's for both of us. This is all so new to me that I have to learn right alongside him. This has caused quite a few challenges for us in a short time( I am not very savvy with computer programming), though I do enjoy learning something new. It's nice that my son can see, first hand, that even adults learn new things. Learning should be something that does not ever end.
  As boring as programming may seem, I was stoked when my son programmed his first text box which proclaimed " hello world" as it popped up onto the screen. I took a lot of photos of the text box and my son working diligently at his computer. Now I needed an interesting way to document photos that, while a huge milestone for us, were in reality quite mundane. Page one was completed last fall.
                                                       
Sassy Lil' Sketch made for Sketches for All's Fall Sketch-a-thon
DCWV Tech generation Stack paper
Bazzill Silver CS
Pink Paislee alphas
DMC floss
MISC. ribbons stamped with colorbox white or black inks
Basic Grey Brads
Black magic glimmer mist
  DCWV had made this wonderful computer language paper in its' tech generation stack. Paired with the Metallic silver card stock, it perfectly symbolized computers and technology.I used some chipboard numbers to create a mask for some black magic glimmer mist. I carried the number patterns off the patterned paper using DMC floss to sew little ones and zeroes onto the page. I stamped more ones and zeroes onto ribbon. It varied the embellishments a little while at the same time, continuing the theme of computer progamming. In the end, I had a layout I loved. However, I still had enough photos and paper scraps for one more page.
  Those leftover photos and paper scraps sat waiting  until recently when I saw the Pagerize This #10 challenge at Scrap Our Stash. I decided to make a page which highlighted my son's dreams of becoming a video game programmer. In place of Lea's block of rub-on's, I used the chipboard numbers to once again make a mask. I chose to use 3 photos rather than just one. I had just enough white space on a photo of the computer screen to place my journaling.

 Scraps of paper and ribbon from the first page were arranged around the photos in such a way that they gave the appearance of creating a background of data strips behind the photos.

In reality, as you can see from the  picture above, the scraps are just sort of tucked in underneath the photo. This method is both a wonderful way to use scraps and a paper saver. I use this with papers of all sizes. It has allowed me to really stretch my stash just that much farther. From the photo, you can also see a close up of the stamped ribbon. Stamping on plain ribbon is another way to optimize the theme on your page. Plain ribbon can often be found in large rolls at the fabric store and is much less expensive than printed or fancier ribbon. It's something I plan to add more of to my stash in the future.
  From the original page down to a wonderful scraplift made with, well quite literally, scraps, I have two wonderful pages documenting my son's dreams and one of the milestones he reached in getting there. There is still time to pagerize Lea's wonderful page. Pop on over to Scrap Our Stash to check out Lea's page and to submit your work. We'd love for you to share it with us!
                                                            

Wednesday, June 8, 2011

One Man's Trash is A Scrapper's Treasure

   Lately, I have been experimenting with a more artsy side in my scrapbooking pages. It's not one that works with every page I do, but in some cases, I think it lends a wonderful tone to the story of the page. This is one of those pages.
  I have the misfortune( or perhaps fortune) of having 3 pairs of jeans that have become worse for wear. So much so, that I retired them quite recently. Much to my husband's dismay, this did not mean I threw them out. On the contrary...they have found a new life as a scrapbooking supply. After all, he doesn't want for me to go out and BUY any denim for a page, right? So when I started pulling supplies for this page about my son and husband tossing a football around our patio, the scrap denim was one of the first things I chose.
   The next supply I gathered up was a small piece of bubble wrap. The previous inhabitants of our rented condo were gracious enough to leave me a roll in our top closet. I like to use it every now and again to stamp with paint onto a page. I think it was quite considerate of them to supply me with enough of it to last quite awhile.
   Now that leads me to the next supply. I am sure you are wondering about traditional things, like patterned paper or rub ons. We'll get there...just not yet. One man's trash is another man's treasure, right? Which leads me to my next choice....cardboard. I took a little of the box my recent scrappy goodness arrived in. USPS boxes have this wonderful tiny corrugated pattern inside, once you rip off the outer layers.
  If you are like my husband, you may have a strange look on your face, especially given that, when  asked about what I was doing, my response was that I was scrapbooking some photos featuring images of him and our son tossing a football around the patio.  I can't imagine what he was thinking as I ran around the house cutting up jeans, stamping them with paint and bubble wrap and then with the utmost precision, ripping cardboard. Perhaps, he is wondering why I ever bought traditional scrapbook supplies. LOL I am sure you are quite intrigued about what I created as well. So here it is:
Sketch Inspiration #223
Scrapfit Workout#45-around the house
Paper issues submission-for the guys
Fancy Pants rub ons
Cosmo Cricket football tag inked with colorbox chestnut roan
Colorbok star epoxy sticker
Basic Grey brads
Fancy pants dot border cut from a transparency
Basic Grey mini marks alphas
Homemade mist-walnut ink with silver paint
Candy Apple red glimmer mist
white acrylic paint
denim
cardboard
DMC floss

I splattered some Candy apple red glimmer mist along with some homemade mist onto the page.I used some staples to attach the denim scraps. I had a handy chipboard template for the bracket which I hand cut from the cardboard( after I sprayed it with archival mist). I then began applying the more traditional scrapbook supplies. It's a fun page. The cool part about it...these photos all show my husband facing left. When I make page two, they will be photos of my son will be facing right...just like they are IRL tossing the ball. I am not sure quite when I will get to page two though. My black evening bag broke this weekend. SO I am off to recycle the gazillion black beads and wonderful hardware off of the bag. Wonder what I can make with those things....

Monday, June 6, 2011

Echo Park's Fresh Face Campaign

   Recently, I realized that I have a big love of Echo Park's paper lines. Each kit is so easy to use and most of them are very unisex. I love that a quick change of embellishments can make the paper have a masculine or feminine feel. Papers from one kit easily interchange and mix with other kits. Of all the paper kits I have, I find theirs to be the most versatile.Since I have such a big crush on everything Echo park, I figured I would give their new fresh face campaign a shot. How awesome would it be to be featured on their blog?!?! So wish me luck, sit back and enjoy some layouts I have created using some fabulous Echo Park papers!
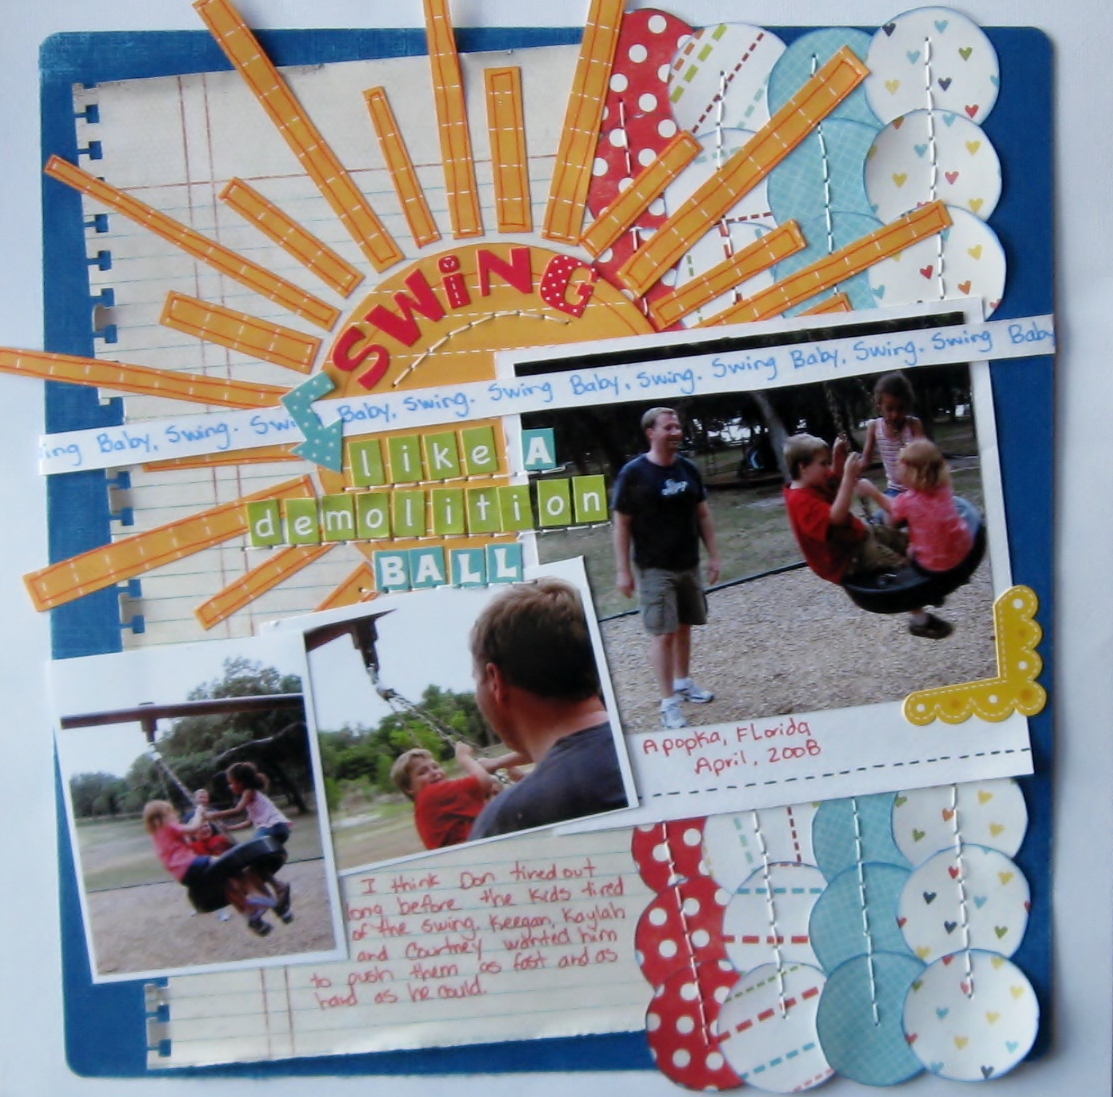
   This first layout is one of my new favourites. I love the bold, bright feel and overall tone of the page. Every time I see " Swing Like a Demolition Ball", I immediately smile. I love how the rich colour and layered details  highlight these wonderful photos of my husband as he pushes my son and his friends on a tire swing. I hand cut all of the elements on this page.Inking the patterned papers and using the Bic Mark It's added subtle detail to the page. Lately, I have really been favouring my pens and stamp inks as an inexpensive way to add a more finished look. I used an EK Success punch along the notebook style paper. I wanted it to look as though it was really torn from a notebook, so I bent and ripped the tabs a little to provide that effect. Rolling the paper at the edges also gave it a more worn feel, adding another subtle detail.
Scraplift of Little Stingray by Amy Peterman for Club CK Scraplift challenge
Card stock: white- Colorbok,
 blue-Coredinations sanded slightly to show the core
Patterned papers: notebook paper-Basic Grey
all other papers from Echo Parks' Summer Days,Sweet Summer time and Playground collections
Ek Success notebook border punch
Alpah stickers- Echo park - green alphas from Echo Park's Playground collection
all other alphas from the Echo Park's Summer days collection
Arrow and yellow photo corner from Echo park's Summer days collection
Bic mark it's: Rambunctious red,Sunset orange,tuxedo black and Blue Skies Blue
SEI ink blue ink on patterned papers
Studio G orange ink on the sun's papers
DMC floss-white
  If you are wondering about the title...it came from some song lyrics. I love using song titles or lyrics on my pages. They provide some very interesting titles that jump from the page and capture your attention. This particular set of lyrics comes from " Write a Song" by the Dave Matthews Band. It's part of challenge#173 over at Scrappin' the Music.
  When you think of the colour pink, you don't immediately think of boys or fish. So this next page may surprise you a little. I chose pink as the base card stock, not because of it's feminine quality, but rather for how it reminds me of the Caribbean. It ended up being a nice compliment to these photos of my son feeding stingrays at the Atlantis resort on Paradise Island, Bahamas. The bright shade of pink with this fun combination of  Echo Park Papers screams out "summer fun". Papers cut into round shapes give the hint of bubbles floating on the page. I used a black pen to add a bit more detail and to refine the idea of a bubble. Hand cut fish also lend to the theme.
Scrapbook Challenges Sketch #240
White Acrylic paint
Card stock-DCWV
Bic Mark it-tuxedo black
papers,border sticker and Alphas from Echo Park's Sweet Summertime collection
   Since the title of this page is feeding frenzy, I chose fun alphas over a layer of white acrylic paint. The messy paint and splatters of glimmer mist add to the feeling of chaos amidst a feeding frenzy. If you are now wondering whether or not to ever participate in a stingray feeding, have no worries. The stingrays are really quite gentle and are more like excited puppies wanting a treat when they see you holding that metal bucket full of fish.
   The last page I will share with you tonight is one you may remember is you have been following my blog. It features the only other female in my household, my cat Sweetpea. This page is the perfect example of how a few embellishments can make a page more feminine. For " A Pair of Roguish Eyes", I wanted a fun,yet girly page. I chose pink and yellow papers paired with prima flowers to achieve that effect. the use of an orange pen adds to the fun feel of the page and provides the added detail it needs without adding bulk.

Scrapbook challenges sketch#252
plum pudding spritz
martha stewart border punch on vellum
prima flowers
making memories jewels
chipboard stamped with a studio g stamp in colorbox white ink
K and co, wood alphas
making memories tiny type alphas
bread tags
Echo Park Sweet Summertime Papers
Bic Mark it in Sunset Orange

My husband captured this photo of Sweetpea peering out of the bathroom sink. It's one of her favourite places. She loves to lay init when she's warm. She also loves playing with the water out of the faucet. She is quite the little imp, hence the title of the page.
   I hope you have enjoyed these pages featuring some of Echo Park's paper collections. Now it's time for me to cross my fingers and hope that just maybe you will get to see some of my pages featured on Echo Park's blog.

Sunday, June 5, 2011

June's Counterfeit Kit

   It's that time again! Like a little kid, i have been eagerly awaiting the reveal of this month's Counterfeit Kit Challenge. While a part of me know's the things I will be using are already a part of my stash, another part of me is excited. Putting these kits together is almost as exciting as receiving a kit club in the mail! Those of you who have followed along with my other kits will not be surprised to see that, as usual, I went overboard as I shopped my stash. My only justification for that is that A. I did not spend any money in the making of this kit and B. I always intend on getting the most that I can out of it. Last month, I was able to make seven pages from my kit's supplies. This month, since I have no plans to travel and DH has a few paid holiday to burn, I hope to get even more pages done. Let's see if I can top seven pages.
   As for the kit itself, It may be a bit of a challenge with so many floral accents. Since the kit is styled after Burlap and Buttercups June 2011 kit, which has a slight summer tone, I am hoping I can utilize these summer florals in some masculine pages by playing up the colour palette. I got as close to the kit as I could in paper pattern and colour. I chose not to use any butterfly accents. Should I make any pages where I wish to use a butterfly, I shall cut one out of the Patterned paper from the kit.
Papers: turquoise- from the Best of K and CO.
Basic Grey basic-ledger
Crate paper restoration-Slip Cover
Crate Paper restoration-doilies
Sassafrass- Indie Girl-Pocahontas
Pink Paislee 365 degrees 6x6 pad
frame- Making Memories Chloe's Closet
Maya Road chipboard album-classic scroll frame
Maya Road Signature ribbon/trim in blue
Twinery Baker's Twine in Pea Pod and Caribbean
Sassafrass In stitch blossoms in kelly green,kraft, and vintage rose
Jenni Bowlin die cut journaling cards
Scenic route Garden grove laebls
Little Yellow Bicycle stick pins
Fancy Pants Write Now Rub ons
K and Co. fabric brads
Making Memories poolside brads
American Crafts thickers-Forest
Pink Paislee 365 degrees rub on
Pink Paislee 365 degrees borderlines


   You may be wondering about the chipboard album. I am not one to make mini albums, though I do greatly admire them. What I prefer to do, is to take the album apart and use the wonderful shapes on my pages. I thought the scroll pattern of this mini would make a wonderful substitute for the chipboard frames in the original kit. I can also opt to cut my own chipboard frames if need be.
  I also opted to make the add on summer kit. I chose a variety of papers from the scenic route grab bag I had received recently. They are the types of papers I might not reach for right away. I felt they complimented the papers from the main kit and that with the addition of the turquoise paper, the colours had a very summery feel to them. I do realize that there was only one bottle of mist in the original add on kit. However, lets face it, I LOVE to mist. So we all know it's highly likely for a variety of these mist colours to end up on a page.
papers: Sassafrass Indie Girl- free spirit
Sassafrass Indie Girlaffection
October Afternoon- patio umbrella
Scenic Route - Providence:Green st,Franklin St. and Scrap Strip
Scenic Route Sonoma- Plive Ave.
Making Memories Paperie greenhouse spiral journal book
Pink Paislee 365 degrees flip notes
Sassafrass paper whimsies- beatnik buds
K and Co. chipboard frames
Creative Memories black alphas
Making Memories simply stated rub on alphas
glimmer mists: patina, sapphire,tiger lily,viva pink,meadow green and candy apple red

  For both the main kit and the addition, I tried to choose papers I might not normally reach for. When I make these kits, I can often perceive new options for the papers and patterns that I might not have seen before. I also made it a point this time to choose some embellishments from pre-opened packages. I am challenging myself to try to finish those packages off. Stay tuned for further posts showcasing pages made with my June Counterfeit kit...

A Little Bit of Hot Air

  So what comes to mind when you think of hot air? Some might think of the hot summer weather. My husband might jokingly tell you it's the things I say. In regard to science, it's what can make a balloon go up. No...I didn't take a ride in a hot air balloon, though part of me wishes I had. It would have been a wonderful way to teach my son, first hand, about the heating and cooling properties of air. We settled for our own tiny little hot air balloon, made in the comfort of our kitchen with a party balloon and some heated water. We attached a little balloon to an empty glass bottle, then boiled the bottle. My son's reactions to such simple things never cease to amaze me. As the balloon began to expand and rise, he cried out in sheer amazement. Then as we began the process of cooling the bottle in a container of cold water, I heard his tell-tale exclamation of  "ooohhh, cool!" Another lesson learned. Another series of cute photos to scrap. More requests of " Can we start with science today?" What can I say except that I love being able to homeschool my son.
  The experiment and photo taking was the easy part. Picking the right paper was also very easy for me. I had gotten some Kaisercraft papers with balloons in a recent club kit last Fall. How I was going to align the photo and place them on my page seemed to elude me. This past week, a challenge was issued at From Screen 2 Scrap which featured the movie poster from Disney's UP. When I saw that poster I knew it would be the perfect challenge to use these photos on, but I also knew how the photos should be placed on the page.
                                                                       
    Before placing the photos, I splattered the card stock with some home made mist. I had mixed some walnut ink with silver paint as a sort of experiment. The walnut stain had turned the silver paint into this wonderful golden mist. I next matted the photos on a cream and brown paper, rolling and tearing the edges as I went. I felt like it gave a "well travelled" feel to the papers as did adding a little Colorbox Chestnut roan ink. As I placed the photos, I followed the images of the people in the poster.I anchored the photos to the page with strips of patterned paper. I used the title and date as places to add my title and embellishments. I used my new WE R Memory Keepers cloud stamp on the page. and then strategically added chipboard and fussy cut images of hot Air Balloons. I used 3-d foam on the fussy cut balloons to add dimension. Little Yellow Bicycle alpha stickers and some older scrabble style letters created the title floating among the clouds.

  I love how the elements add a hint as to what the photos are about, even though we did not get to experience a real Hot Air Balloon adventure. Using the poster as a guide, I was able to make a fun, yet quick page to add to my album. The poster is also a reminder that we can make a scrapbook page sketch from anything we see. We don't necessarily need someone to make a sketch for us. So if you are stuck in a creative bind, try checking out a few movie posters or ads for inspiration.