Showing posts with label Handstitching. Show all posts

Friday, June 15, 2012

Tangerine Tango

It's the Pantone color of the year for 2012. Tangerine Tango is bold and energetic. It was a part of my first assignment at Get it Scrapped. Along with my fellow creative team members, we shared a variety of pages in various hues of orange. To get the most of this vivacious color, check out the article over at Get It scrapped.

Supplies: cardstock: Colorbok; patterned paper: Echo Park and Basic Grey; mist: Maya Road; buttons: My Mind's Eye; other: Pencil, stencil, canvas, Kraft paper accents

I often choose orange when I scrap pool photos. The turquoise water pairs naturally with the orange to form a complementary color scheme.Since this color combo was already so energetic, I chose orange and neutral embellishments.

Sunday, February 19, 2012

Not Quite Straight and Even

 I have always had a problem with lining things up correctly. I can sort of eyeball something and cut it fairly close to the dimensions I need. However, despite rulers and various scrapbook tools, I somehow always end up with pages that are somewhat skewed. I guess I could let it bother me, but the frustration of constantly taking pages apart( over and over again) just to find that I have put them back together, yet again, slightly off kilter has led me to believe I will never be a straight, on the grid kind of scrapbooker. It's ok. I guess it's just a part of my style that is inherently me. Besides, if I never told you I meant for this page to be nice and even, set  in the center would you have ever known? it looks like it was meant to be this way.
All products are OA with the exception of DMC floss,
glimmer mist in spring rain and perfect pearls mist in Biscotti
Someone told me it adds to the character of the page. Maybe it's a happy mistake. Maybe my sub-conscious did this on purpose. Who knows?!?! Either way, I chose to accept how I made this page and I really do love it just the way it it!

Monday, January 9, 2012

The Making of a Monster Shirt

  I have a very vague memory of making an iron on shirt with my mom as a kid. The memory is so vague that I am not sure if it ever even happened. Saying that makes me feel quite sad. So much so that I hope  my son manages to have more vivid memories of me. At the least, he will have tons of scrapbook pages to reference what some may believe is an over-documented childhood. Isn't it great to be a mamarazzi?!?!

  Anyway, When I saw Amanda's page for the Scrap our Stash Pagerize this challenge, I knew I had to lift it. I loved the dynamic look of the circles on her page. I also liked how the smaller cropped photos acted like embellishments to support the main photo.
SEI papers, Basci Grey Brads,DMC floss, glass beads
artsylicious green brad, Fancy pants star sticker
papr trunk alphas, basic grey woolie
Cosmo cricket chipboard arrow with souffle pen in white
colorbox black ink
   Can you spy my new favourite product? I began using them on my pages within the last few months. They are glass beads. I have some that have been in my stash for awhile now. They are sprinkled onto the word   "monster" and then adhered using glossy accents. The little black beads were salvaged from one of my favourite evening bags( I was pretty sad when it broke!). I am finding that glass beads are an economical way to add a little more umph to my pages without breaking the bank. I have made my own stick pins as well as using them to decorate pages or embellishments. I hope to add more colours to my stash at some point in the future. Meanwhile, I am glad I finally pulled these out to play with.
  If you have something new to share or would like to pagerize Amanda's page, please pop over to Scrap Our Stash and drop us a note.

Sunday, January 8, 2012

Painted Out

  About a year or so ago, I would have never considered painting on a scrapbook page. Paint has become  a staple product in my arsenal of tools. I was glad to have it when I pulled out some Halloween photos from a carnival we had taken my son to. I always struggle with photographing him at carnivals. There are just so many people around. It seems like strangers always get into the shots. When I do come around to scrapping pages from events like these, I often find myself trying to come up with ways to hide the unwanted people in the background. Sometimes I use embellishments. Other times, journaling on strips of paper does the trick. For this page, I chose to use paint.
Frosted Designs Sketch #31
Basic Grey papers
DMC floss, white acrylic paint
Glimmer mist in black magic and tiger lily
K and company border stickers
Prima black ribbon
Cosmor Cricket tiny type alphas
glossy accents
 Marcella K large black alphas

 I just started the photography class at big Picture. So maybe the next time I take my son to a carnival, I will know some tricks to take better photos in crowds. Meanwhile, I have photos of the less than perfect nature from past years. I guess it's a good thing that I like paint!

Sunday, August 21, 2011

Legos and Acrylic Paint

   My son is not very happy with me. The other morning, I borrowed some of his legos so I could use them on a page. I could not ask him if it was ok because he was still sleeping. So, I snuck into his room and got some. You may be wondering what I did them with. Well, I stamped with them and some acrylic paint to create a background for a Lego themed page. I had a lot of fun doing it, but I must admit, the page is busier than I normally prefer. Either way, it another page completed.
Artastic challenge- August Inspiration challenge
Echo park papers
acrylic paint
legos fussy cut from unkown papers
photogenix laser cuts-title


  My son was part of a homeschool Lego club. I wanted to make sure we took photos of some of the projects he made. After all, they are legos and are meant to build and rebuild with over and over again. 
page maps sketch
echo park papers, stickers and die cut
legos and number stickers unknown

  So now, the Legos are back in their proper place. I have made a promise to my son that I will wait to ask him before using his toys with paint supplies( no matter how much my creative juices are flowing). The world is right again and I have two more pages for my album. 

Thursday, August 11, 2011

The Last Mission


   We didn't get to go see the shuttle lift off in person. Like many, we watched it live on TV. For a few days, it was all my son talked about. So it was definitely something I wanted to document. When I saw the current pagerize this challenge at Scrap Our Stash, I knew it would work well with the shuttle commemorative patch and the photo of my son at KSC.  Sometimes, it's difficult to find a sketch or page idea for using a 5x7 photo. Often, when I use 5x7's, I substitute it for 2 smaller photos as I did here. I also rotated Tammy's page to fit the orientation of my photo.
October Afternoon Rocket age paper, sticker and ephemera
NASA mission patch
DMC floss
Creative memories alphas with glossy accents
Pagerize This #12 challenge- Scrap Our Stash
  Since we did not attend the shuttle lift off in person, I went on-line and gathered some headlines which I will use for a second page later on. I plan to journal from the notes I took of my son's comments about the shuttle.Newspaper clippings and personal thoughts are  a great way to document historic events in your scrapbook albums.
You still have some time to pagerize Tammy! Don't forget to share your page with us at Scrap Our Stash!

Sunday, August 7, 2011

A Kitty Comparison Part One

  Anyone who has pets will tell you that each pet has their very own, unique personality. My two cats are no exception to that rule. Each of my cats prefers to be held and cuddled in different ways. I decided this might be a good thing to document. So for once, the idea for the layout and the journalling to go with it came before the photos.  So last fall, I staged some photo ops with my son and both of our cats.
  I did get around to making one of the the pages last December. In the coming days, you will get to see that page as part of my post for Scrap Our Stash. For now, you'll have to be satisfied with seeing the page about Sweetpea, my female cat.
Sketchy Thursday's 8-4-11 sketch
Basic Grey max and Whiskers collection: Stickers,
papers and trim
Maya Road heart
Twinery twine in cappucino
Fancy Pants alphas
white acrylic paint
Smooch Spritz in spun sugar
DMC floss

  Sweetpea is one of those cats who can't get enough time to cuddle with you. You can hug her, carry her around the house in a basket, throw her over your shoulder...whatever the method, she just wants to be close to you and she is happy. Sometimes though, as in the photo, she can be a bit of a distraction during school work. She has a tendency of climbing onto you and then sort of draping herself over your shoulder like a scarf.
  In the next few days, you will see the post with the layout about Boo. He is a little more aloof than Sweetpea is. He prefers to hang out close by. When he does want to be held, he wants to be held like a baby being rocked. GO Figure! So stay tuned...

Thursday, July 28, 2011

Flowers for the Fourth? July Counterfeit Kit Challenge blog hop

Welcome to the July Blog Hop for the Counterfeit Kit Challenge!   You should have arrived here from Angela's Blog. If you are lost or arrived here first by mistake, hop on over to The Counterfeit Kit's website to find the right path. I hope you enjoy all of the projects being shared!

If you had come to me last month and asked me which papers from my stash would be used to scrap our family Fourth of July memories, Floral prints would definitely not have been on the list. Yet here they are on this next page! I got the idea from the counterfeit kit club challenge.If you don't know what it is( though most likely you do if you are hopping along)... The idea is to scraplift a kit from a kit club using what you have in your stash. One of the kits I saw had a lot of blue and red  floral papers in them. Since flowers are not always easy to use on a page for boys, I felt this would be a great opportunity to use them. Oh...and would you believe there are travel themed items on the page too!?!? The journal spot and the tab sticker on the corner of the photo are from travel collections.
page maps sketch For Counterfeit Kit's 4th of July sketch challenge
starburst paper- Cosmo Cricket
all other papers Sassafrass
sassafrass border
Prima flowers
foof a la buttons
7 gypsies tab sticker and paper clip
Journal spot unknown( Maybe K and Co.)
Making Memories rub on alphas
hand made denim flowers
Basic grey Border sticker-cut apart
Originally, this was going to be a page about sparklers. However, I kept looking at this photo of my son and a sort of, deeper meaning manifested itself. He doesn't have the "trying too hard,sicky sweet smile" that he has had lately. It's the real him...just sweet and pure. So I journaled about that. The title for this page comes from a song by Bob Marley called "three little birds" which is the current challenge at Scrapping the Music.
  I did manage to make another page about the sparklers. We have not had any at the fourth for several years. So it was a nice treat for my son to have some and to share the fun with friends this year. Once again, the floral paper came through for me. I think it gives it sort of a vintage, yet warm feel to the page.
Sketch Inspiration #229
diamond Stickles
otherwise, everything use are scraps are from the above layout
I printed out my photos in wallet size. They were so nicely done on the photo paper, that I trimmed it down and used it as a collage style block. It was a HUGE time saver. My rub on alphas did not go on perfectly. I used a black marker to fix the letters as best I could. The "f" is still a little wiggly though.
 The next time you are feeling a little blue about not having the right themed papers in your stash, check out a kit club or the counterfeit Kit challenge. It just might give you some ideas to help you rethink how to use products you already own. Now it's time for you to hop on to Emily's Blog.

Sunday, July 24, 2011

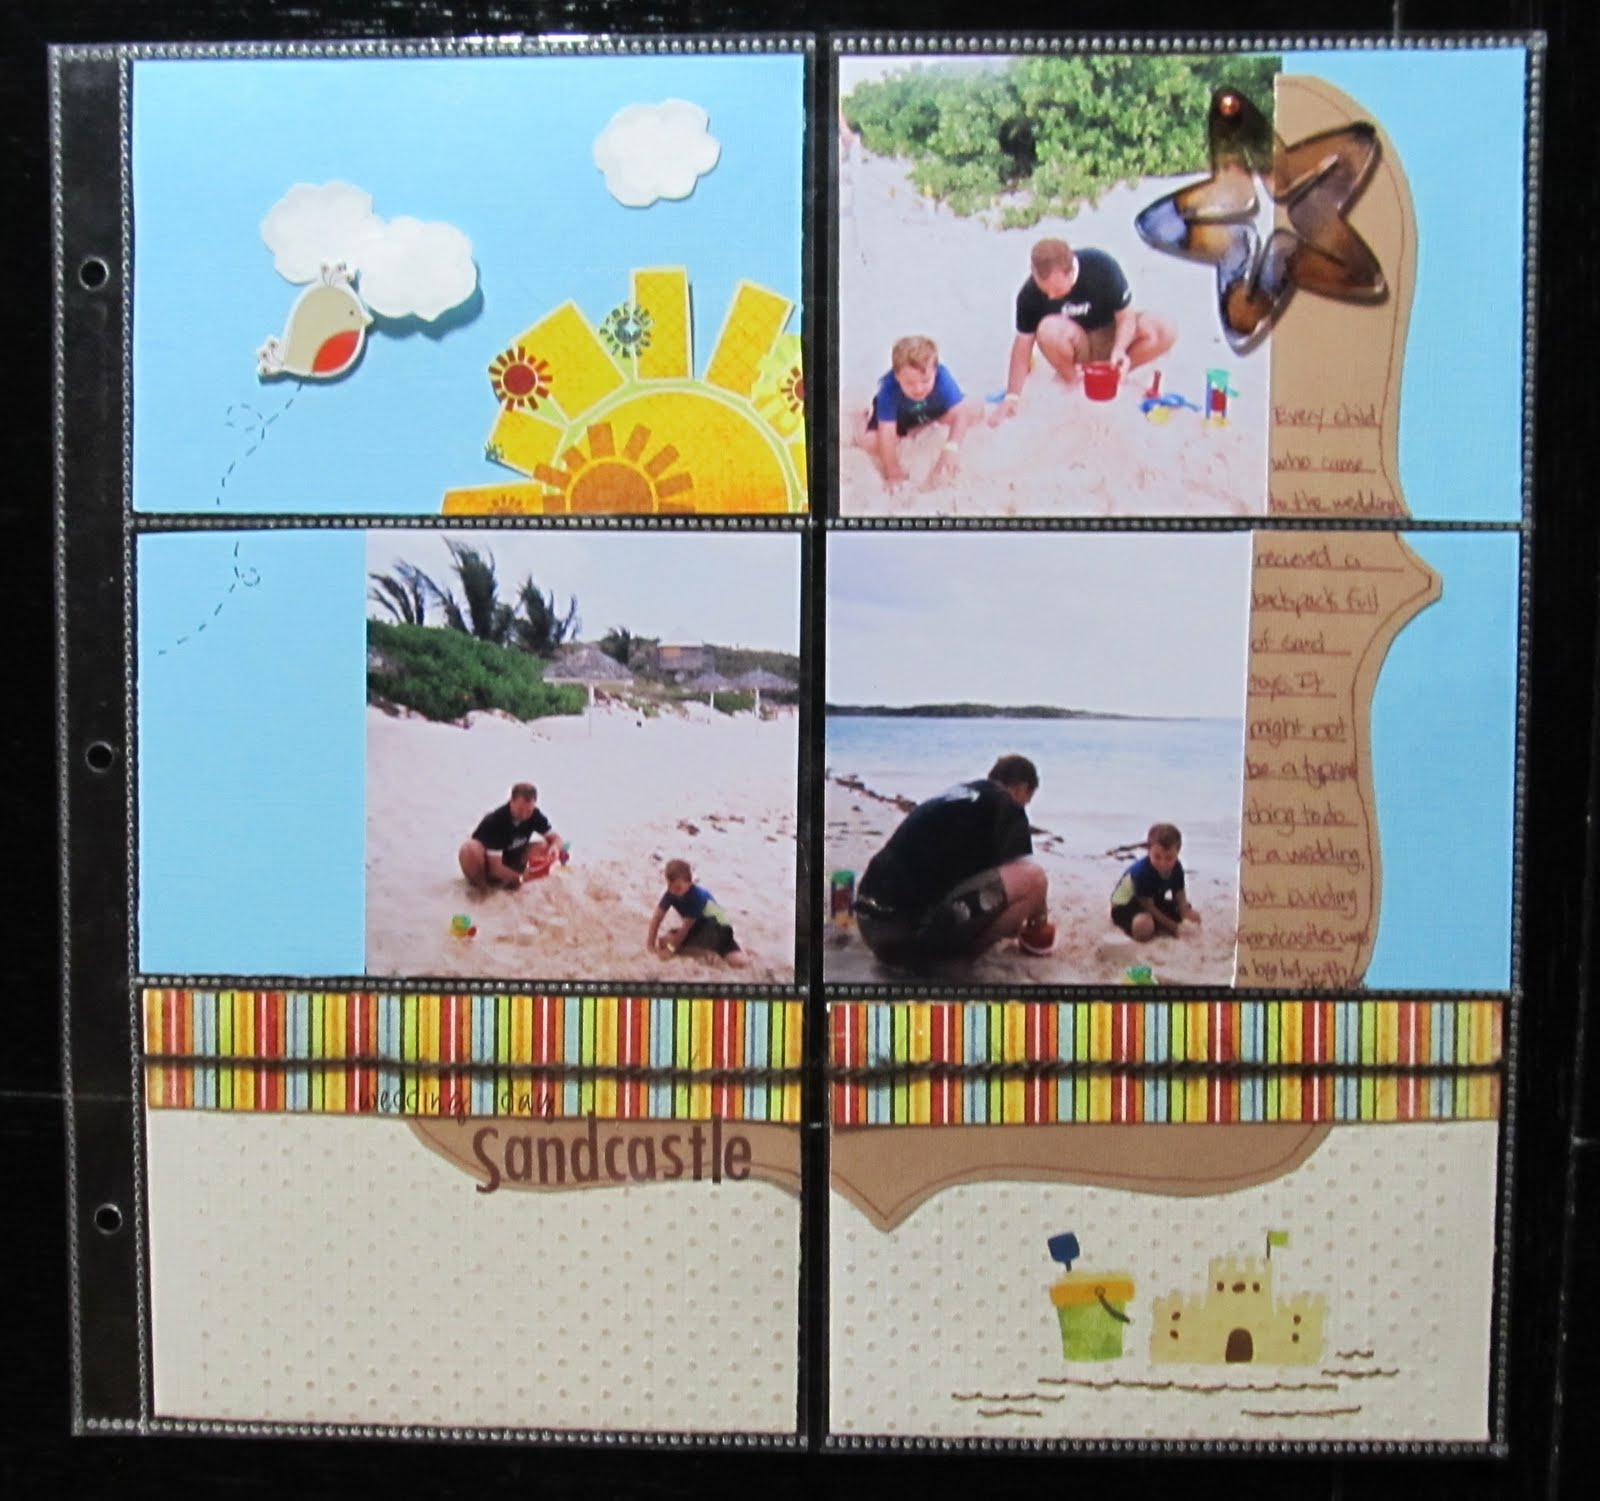
Wedding Day Sandcastle

    A few years ago, We were invited to attend a beach wedding. It was a lot of fun, though I will admit it felt very odd to attend a wedding dressed in a bathing suit and beach attire. My son thought it was awesome. He hates to dress up. The bride also made sure all of the kids who attended would receive a backpack of sand toys. The sand toys kept all of the kids( and my husband) occupied while we awaited for the wedding to start. It was a definite win-win scenario!
   I left my camera at home since the wedding was at a beach. I opted for some disposable waterproof cameras as I had no idea what we might encounter in regards to sand and water. When I began scrapping these pictures, I decided to try some of the 4x6 pocket sleeve style page protectors rather than the traditional 12x12. I had received a package of them for free with an album purchase.I figured this would be a great opportunity to use them since the photos were all standard 4x6 prints. I found there were a lot of pro's and cons to using these page protectors. You really need to plan where these will go in your album as the pockets are on both sides of the page protector. Using the photo sizes the pockets are intended for makes things a lot easier. I think If I had used one of the kits, like the simple stories line, which are designed for these types of page protectors, I would have had a much easier time. Once I got going though, it made for a quick and easy page.
Items from my July counterfeit kit:
Fancy Pants Paper and rub on's
Making Memories alphas
not from kit:
Jillibean soup twine
dmc floss
DCWV chipboard bird
Studio G stamp in white inke with clear embossing powder
Coredinations CS embossed with swiss dots folder and sanded
Colorbok CS
Maya Road Acrylic starfish coloured with eggplant and ginger alcohol inks

I did crop the 4x6 photos down. Not cropping them would have allowed me to just slip them in the pocket. I also chose a Pagemaps sketch, which meant it took a little more time and thought. For a faster page, I could have just decorated 4x6 cards and journal spots and slipped those in. On a positive note, I was able to use scraps for almost the entire page!

Shown above, are the backs of some of the 4x6 blocks. The white sections are the photos. You can also see how I covered page scraps that would otherwise have had gaps or sections missing with other pieces of paper layered over it.
 I could have left the tan paper and white clouds plain. However, embossing them gave just a tad more texture to the page. The sand coloured Coredinations cardstock was embossed with swiss dots using my texture boutique. I lightly sanded it to reveal the slightly darker core colour. I chose to use white ink in a cloud shaped stamp with clear embossing powder to add a subtle lining to the clouds. While these would have been just fine plain, this tone on tone embossing gives it a more finished look as does the hand stitching under the sand castle rub on.
 Now that I have the hang of working with these type page protectors, I will certainly consider using them more often. I think I will try some soon with one of the kits that are designed for these. Maybe then, I will find I like them even more than I do now.
 

Tuesday, July 19, 2011

The Method Behind the Little Monsters

  I am in the process of training for a Marathon. It's not the kind you run. It's the kind you scrap. It's also known as the Mother LOAD. Over the next few weeks, we'll be training to scrap 26 pages over the course of 26 days. For those of you who don't know what LOAD stands for, it means LayOut A Day. Finding the time to make a scrapbook page every single day is quite the undertaking. I have completed two other LOAD's this year. During the first one, in February, I managed to create a page every day. For the second one, in May, I managed to make a lot of pages but did not get to scrap daily. I did learn a lot during both. The main thing being that letting go of perfection is fine. Just choose your photos and products and start scrapping. I have made a lot more pages since then. I find that I am loving more of my pages now that I have freed myself from making them perfect. After all, people are looking at your albums for the story, not your page composition.
 As part of the Mother Load, we were asked to go over our creative process. While creating pages this week, I realized that I have more than one process. I think this is a good thing, as it open me up to different means of inspiration. I thought I would share a couple of those creative methods with you today.
  The first page was inspired by an HTC phone ad that I saw while reading a magazine at the hair salon. It looked a lot like this one:    
                                                           
                                                     
So I snapped a photo of it on my smart phone. What I liked most about it was how the phone made the letter O in the center of You. I wanted to do something like it on a page.I actually held onto it for awhile until I came across the right photos. I ended up using a photo and hand stitching to create the O in Monster's.
SEI papers and sticker
Basic Grey alphas
paper trunk Black alphas
colorbox black ink

This was one of those photos that I had been unsure what to do with. Sometimes ideas or thoughts sort of stew around for a bit in my head.The same went for the paper( no clue how to use it), but once I got the idea for the title, the page came together. By sticking with the SEI kit, I was able to quickly select papers and stickers to go on the page. Paint has become a go to medium for me. I can always get the colour I need versus spending time searching for the perfect Cardstock. In this case, the paint helped tone down the busy pattern. I used to hang onto elements like the sticker because I felt they had to be used a certain way as they were intended. Now, I have no fear about altering them. In this case, it was designed to be about one person. I just chose to cross over the word "is" and write in the word "are" so that I could include all of the kids' names. I also made an error on this page. I wrote the date incorrectly. While I was able to wipe it off, it left a smudge. I decided I was ok with it, since the page was a bit messy anyway.
 Sometimes photos inspire me. Other times, I see a sketch and instantly know what photo to use with it. I tend to print off a bunch of photos and I have them in my albums in the order I want the finished pages to be in. When I saw the Sketchy Thursday 7-14-11 sketch, I knew at once which photo I wanted to scrap. I had a second little monster themed photo.

Sei papers and puffy black alphas
Cosmo Cricket tiny type alphas
dmc floss
white acrylic paint
Sassafrass chipboard number
Sketchy Thursday's 7-14-11 sketch

Having made the prior page, it was easy to find and use the same supplies. In fact, I often tuck scraps from the first completed page into the album right along with the other photos. Then they are right there when I am ready to work on page two. Having the sketch right there meant it was easy to pull the elements I wanted for the page from the scraps. The title took a little more thought. often on the second page, I will not include a title or will make a subtitle. In this case, the title is part of the journaling which reads " I could hear them giggling. So I peaked under the bed and 6 eyes stared back at me." The white paint helps anchor the photo on the page along with the shelf created by the scraps and stitching. A visual triangle has been created with the orange monster, orange writing in the journaling, and the orange strip of paper under the title.
  I have a few other creative methods that inspire me to work. Most of the time it's a photo. Sometimes, it's a new product or a kit I made from shopping my stash. What allows me the most time to scrap is the way I arrange my photos. I think that's something I shall have to photograph and share in another blog post.

Monday, July 18, 2011

Cool...Like a Fool in a Pool

  It's a fun title. The rhyming sing song chant of it sort of gest you amped up for a fun scrapbook page. It's one of the rub on titles from Fancy pant's beach bum line. It was perfect for these shots of my son and husband in the pool. My son was actually being quite the silly fool on this particular day. Apparently, it's quite fun to swim underneath a waterfall...which he then decided to do over and over again. I guess it's a kid thing. My favourite part about these photos is how my husband is always nearby and smiling. He's not one to pose for photos very often ( partly because I take too many photos). Quite truthfully, these are candid shots of him watching our son...which makes the shots all the more special to me.
  I went a little out of my comfort zone for this page. I chose to try some free collage software recommended by Club CK. It's called Photovisi.You just go to their website, pick a collage and add photos. Then you can move your photos around and edit it.After you are done editing, you save the collage to your computer and print.The only downside is that when you print your collage, there is a small watermark on one corner. I cleverly hid it with the ric rac trim and swimsuit style banner.

Making Memorie sabrina frames, cut and painted turquoise
dmc floss
twinery twine in carribbean
Fancy Pants paper and rub on
maya road Ric rac
Basic grey brads

The rub on and swimsuit trunks are from my July Counterfeit kit. I fussy cut those swim trunks from some of the fancy pants paper. The photo corners were my son's idea. I had scraplifted this page from Kathleen Summers ( see her page here- Fabulous 4th). Her page has photo corners. looking through my stash just did not reveal the right thing. I had this MM frame from the Sabrina collection and my son made the comment that it was a shame it wasn't blue. This gave me the great idea to paint it with turquoise acrylic paint. I cut it apart and did just that. It left enough pieces for use of my second, complimentary page.

We R Memory Keepers chipboard sign
Maya road chipboard brackets with yellow acrylic paint, gold pen, and diamond stickles
We R Memory keepers eyelets
ATD sticker
American crafts rub on alphas
basic grey brads
  This is a page of my own design. I placed the photos, in what seemed to me, a pattern that reminded me of the slide's shape. I also chose the road sign for that reason. I used scraps from the previous page with more fussy cut swimsuits. I wanted brackets to match the sign, so I painted them yellow and used gold pen.
  I can feel really good about these pages because I used up several things from my stash that, before now, I had no clue what to do with: the frame, bathing suit patterned paper, and the road sign. Combining the travel and beach theme in my counterfeit kit really helped me see these products in a new way.

* also submitted at Scrapfit for WWU#9


Friday, July 8, 2011

I want this thing off me...a Pagerize this challenge!

A very short time ago, we had a very sick cat. He had several surgeries and fought off severe infections and complications from kidney crystals. At one point, we thought we would lose him. In January, I got these photos of him trying to take the cone off of his head. It was one of those defining moments when I knew he'd be ok. Boo was back to being his clown self. He has since gained back all of the weight he lost and his personality is as playful as it ever was. When I saw Joni's page, I knew it would be perfect for this series of photos featuring Boo's attempt's at taking his cone off.
papers- We R memory keeper's Grandma's kitchen
DMC floss
Colorbox chestnut roan ink
Basic Grey alpha stickers and cat ctickers from max and Whiskers line
Making Memories Tiny type alphas in choc. and white
Bic marc it in woodsy brown


  I chose the papers for their fun, but cozy feel. I stitched under some of the title words to add some emphasis to them. The brown marker was an inexpensive and fast way to add a little detail and a more finished feel to the base paper. I used adhesive foam to add a little dimension to the paisley's.

  Now it's your turn to find the right photos and papers so that you can play along with the Scrap Our Stash Pagerize This challenge!

Saturday, July 2, 2011

So Much Energy

  I wish I had it. My son and his friends all seem to have it. Energy, that is. Kids seem to have it in overwhelming abundance. So it seemed fit to scrap these photo of my husband pushing my son and his friends on a tire swing with some bright energetic colours. The title sort of found me via the Scrap it With A Song challenge spot.
All papers and embellishments are from Echo park except:
notebook paper-Basic grey
brads-Basic grey
white CS-colorbok
blue cs-coredinations

Oh and speaking of energy... I hope you have enough to participate in a hop going on through scrapbook challenges. You can start at Brynn's blog. Brynn even came up with the sketch I used for this page. I love the fun banners which were perfect for this upbeat page. It's always fun to see how different people interpret a sketch. So if you'd like to see some other variations, check out the links found here.
 Sorry for the short post, but life is hectic right now. I am pleased to have found a little time to scrap. I am less pleased with myself for not reading all of my challenge list properly. By that, I am referring to the notepad I keep listing all the challenges I want to participate in. I had several I wanted to do for Sketches for all. I thought I was completing one of the challenges with the above LO only to find I was just supposed to use 1 flower and not three.Oh well! Back to the drawing board. I at least have another page done that I like. Happy scrapping everyone!!!

Friday, June 10, 2011

0001110101

   I have no clue as to what I may have said in the title's sequence of numbers. If you are not familiar with these types of number sequences, they are the language of computers. My son is sure getting curious as to how he might translate the way a computer speaks. So to that end, I bought a homeschool computer programming course for him last fall. I say it's for him, but truth be told, it's for both of us. This is all so new to me that I have to learn right alongside him. This has caused quite a few challenges for us in a short time( I am not very savvy with computer programming), though I do enjoy learning something new. It's nice that my son can see, first hand, that even adults learn new things. Learning should be something that does not ever end.
  As boring as programming may seem, I was stoked when my son programmed his first text box which proclaimed " hello world" as it popped up onto the screen. I took a lot of photos of the text box and my son working diligently at his computer. Now I needed an interesting way to document photos that, while a huge milestone for us, were in reality quite mundane. Page one was completed last fall.
                                                       
Sassy Lil' Sketch made for Sketches for All's Fall Sketch-a-thon
DCWV Tech generation Stack paper
Bazzill Silver CS
Pink Paislee alphas
DMC floss
MISC. ribbons stamped with colorbox white or black inks
Basic Grey Brads
Black magic glimmer mist
  DCWV had made this wonderful computer language paper in its' tech generation stack. Paired with the Metallic silver card stock, it perfectly symbolized computers and technology.I used some chipboard numbers to create a mask for some black magic glimmer mist. I carried the number patterns off the patterned paper using DMC floss to sew little ones and zeroes onto the page. I stamped more ones and zeroes onto ribbon. It varied the embellishments a little while at the same time, continuing the theme of computer progamming. In the end, I had a layout I loved. However, I still had enough photos and paper scraps for one more page.
  Those leftover photos and paper scraps sat waiting  until recently when I saw the Pagerize This #10 challenge at Scrap Our Stash. I decided to make a page which highlighted my son's dreams of becoming a video game programmer. In place of Lea's block of rub-on's, I used the chipboard numbers to once again make a mask. I chose to use 3 photos rather than just one. I had just enough white space on a photo of the computer screen to place my journaling.

 Scraps of paper and ribbon from the first page were arranged around the photos in such a way that they gave the appearance of creating a background of data strips behind the photos.

In reality, as you can see from the  picture above, the scraps are just sort of tucked in underneath the photo. This method is both a wonderful way to use scraps and a paper saver. I use this with papers of all sizes. It has allowed me to really stretch my stash just that much farther. From the photo, you can also see a close up of the stamped ribbon. Stamping on plain ribbon is another way to optimize the theme on your page. Plain ribbon can often be found in large rolls at the fabric store and is much less expensive than printed or fancier ribbon. It's something I plan to add more of to my stash in the future.
  From the original page down to a wonderful scraplift made with, well quite literally, scraps, I have two wonderful pages documenting my son's dreams and one of the milestones he reached in getting there. There is still time to pagerize Lea's wonderful page. Pop on over to Scrap Our Stash to check out Lea's page and to submit your work. We'd love for you to share it with us!
                                                            

Wednesday, June 8, 2011

One Man's Trash is A Scrapper's Treasure

   Lately, I have been experimenting with a more artsy side in my scrapbooking pages. It's not one that works with every page I do, but in some cases, I think it lends a wonderful tone to the story of the page. This is one of those pages.
  I have the misfortune( or perhaps fortune) of having 3 pairs of jeans that have become worse for wear. So much so, that I retired them quite recently. Much to my husband's dismay, this did not mean I threw them out. On the contrary...they have found a new life as a scrapbooking supply. After all, he doesn't want for me to go out and BUY any denim for a page, right? So when I started pulling supplies for this page about my son and husband tossing a football around our patio, the scrap denim was one of the first things I chose.
   The next supply I gathered up was a small piece of bubble wrap. The previous inhabitants of our rented condo were gracious enough to leave me a roll in our top closet. I like to use it every now and again to stamp with paint onto a page. I think it was quite considerate of them to supply me with enough of it to last quite awhile.
   Now that leads me to the next supply. I am sure you are wondering about traditional things, like patterned paper or rub ons. We'll get there...just not yet. One man's trash is another man's treasure, right? Which leads me to my next choice....cardboard. I took a little of the box my recent scrappy goodness arrived in. USPS boxes have this wonderful tiny corrugated pattern inside, once you rip off the outer layers.
  If you are like my husband, you may have a strange look on your face, especially given that, when  asked about what I was doing, my response was that I was scrapbooking some photos featuring images of him and our son tossing a football around the patio.  I can't imagine what he was thinking as I ran around the house cutting up jeans, stamping them with paint and bubble wrap and then with the utmost precision, ripping cardboard. Perhaps, he is wondering why I ever bought traditional scrapbook supplies. LOL I am sure you are quite intrigued about what I created as well. So here it is:
Sketch Inspiration #223
Scrapfit Workout#45-around the house
Paper issues submission-for the guys
Fancy Pants rub ons
Cosmo Cricket football tag inked with colorbox chestnut roan
Colorbok star epoxy sticker
Basic Grey brads
Fancy pants dot border cut from a transparency
Basic Grey mini marks alphas
Homemade mist-walnut ink with silver paint
Candy Apple red glimmer mist
white acrylic paint
denim
cardboard
DMC floss

I splattered some Candy apple red glimmer mist along with some homemade mist onto the page.I used some staples to attach the denim scraps. I had a handy chipboard template for the bracket which I hand cut from the cardboard( after I sprayed it with archival mist). I then began applying the more traditional scrapbook supplies. It's a fun page. The cool part about it...these photos all show my husband facing left. When I make page two, they will be photos of my son will be facing right...just like they are IRL tossing the ball. I am not sure quite when I will get to page two though. My black evening bag broke this weekend. SO I am off to recycle the gazillion black beads and wonderful hardware off of the bag. Wonder what I can make with those things....

Wednesday, May 11, 2011

A Journey into the Past

  If you are Looking for the Sketches For All blog hop, hop to this link...or scroll down, if you are feeling in the mood to read along.

  Almost 20 years ago, a tornado destroyed my Great grandmother's home. She survived and came to live with us. She brought with her a few things she had managed to salvage including some very beaten up photos. As you may have guessed, this was one of them. The photo matte was beaten and bruised with part of the photo missing. I had no idea how, or even if, I should scrap these until a recent NSD challenge at Let's Scrap inspired me to do just that. The challenge asked for us to scrap photos cut on the diagonal. Mother nature had already done the job of cutting the photo. So I scanned it, then set about to scrap the original. I matched the papers to the original scroll work on the matte. It's a wonderful black embossed leaf print over the chipboard style base.
Let's Scrap Sketch NSD#1 from 4-30-10
papers-Jenni Bowlin, Creative Memories, Basic Grey
Acrylic paint-buttermilk
walnut stain, alos used as a spritz
prima flower
making memories tag witj Jillibean Soup twine
DMC floss
7 Gypsies brads
Lace- unkown
Crate Paper banner
Basic Grey Stamp in paint-leaves
submitted to Let's Scrap, Punky Sprouts, and Sketches for All


The wonderful thing about my paper selection today is that each one was a paper I was not sure when I would ever use. The base is a piece called feed store by Jenni Bowlin which I received with a scrap kit. I liked the vintage look and so I chose to use acrylic paint to cover the feed store name, date and location. The red paper has been in my stash for at least 3-4 years. It's by Creative Memories. I liked the way it and the brown tones of the Basic grey paper made the photo pop out.  I am very happy to have made another page for my son to see in our family heritage album. I hope someday, he is able to share it with his kids. I invite you to scrap your old photos, no matter what their shape.
 Now, on a less serious note, I am off to submit this to a banner challenge over at Sketches for All and to Punky Scraps. I absolutely LOVE their cat button!

Monday, May 9, 2011

Some Most Unusual Flowers

  While I do love flowers( and readily admit to hoarding quite a few Primas in my stash) I will admit that I cringed a little when I heard that Scrap Our Stash's May challenge was all about flowers. I find flowers difficult to use on pages since my home is male dominated. I quickly realized that I had to get very creative with the types of flowers I would use for this challenge. I recently experimented with making my own zipper flower. I think the flowers look cool and they can have a bit of a masculine edge to them. However, the flowers I made were black...which is really not the colour you think of when you think of Spring flowers. Black flowers make me think of Halloween, which is why you are now going to see a Halloween layout in May.

 My son was a Predator( from the movie last year). I wanted a sort of grungy page to go along with his costume. I splattered some Tiger Lily and Black magic glimmer mist to provide a grungy background. I loved the Pink Paislee canvas label. It provided me with a title as well as a direction for the rest of the page. To match it's used look, I embossed some Coredinations cardstock with a Sizzix folder. I then distressed it to reveal parts of the orange colour in the core. The beads are actually part of a necklace my son got for me. We were Trick or Treating in Disney's Boardwalk hotel. They have games for the kids to play and the bead necklaces were one of the prizes. My Son was thrilled that I wanted to use it on a page( he even went back and won me several more necklaces just to be sure I had enough). I think it's a nice touch with the Satin ribbon and the staples. I used Making Memories papers for the other flowers. The smallest ones were made with a simple office style hole punch. I was inspired by a Big Picture Classes blog post to make the medium size flowers. I used a button punch to make mine. I used a Basic grey stmap with white ink along with an office date stamp, to make the badge. I stamped them on black card stock and then used clear embossing powder. So there you have it...a sort of grungy, Gothic floral page in the middle of May. Proof positive that flowers can be used on any page when you think outside the box.

Thursday, April 21, 2011

Inspired by Art

  Art can provide some wonderful inspiration. From colour palette to them, the possibilities are endless. Recently, I found a wonderful challenge spot called Artastic. This will be the 2nd time I have played along with their challenge. This month's painting featured my favourite time of year...
Autumn Wonder by Debbie Adams
                                                      
and I just so happened to have some fall photos that need to be scrapped. Last Fall, We took my son to Disney's Board Walk to trick or treat with some friends. I was able to get some great shots of the kids with Mickey Mouse in front of a cute fall theme backdrop. I wanted to make a whimsical page with a fall theme, rather than use the bright colours usually associated with Disney. I also did not feel that Halloween papers would be right for the photo. I looked to my April Counterfeit kit for inspiration. The October Afternoon papers gave it just the right cozy, fall feel.
Pagemaps sketch done for Sketches4all
misc. buttons
all papers October afternoon except for red/cream( Scrap within reach)
tree trunks- cosmo cricket earth love paper
Basic Grey Alphas


I used a buttermilk cream acrylic paint over brown bazzill cardstock. I chose to dry brush a bit, so that the brown and the texture of the paper showed through. I alternated faux sticthing and real hand stitching to add to the country style Fall theme. I hand cut the trees and the clouds for the whimsical look I desired.
Sketch Inspiration #216

The hardest part of these pages were the rolled borders. Since I did not have double sided patterned paper, I adhered to pieces together back to back. This made the paper quite stiff. So as I rolled it, I used glue dots to hold it in place. I then chose to hand stitch over the rolls to ensure they would not come undone.
  As you can see, my layouts don't resemble the painting very much. Inspiration does not need to be an exact reproduction. In this case, the colours from the painting and the trees are what made their way to my pages. So next time you see a piece of artwork, consider all of the possible ways in which you can interpret it.

Wednesday, April 13, 2011

The Wave Machine

   For me...sunshine means getting outside to play in the pool! Living in a warm climate means that I have tons of poolside photos to scrap.So, I was very excited to see that Scrap Our Stash's April challenge revolved around the sun. I started off by pulling out my pool and beach theme project folder. It is bursting at the seams with paper and embellishments perfect for scrapping water based activities. However, the more I looked at the photos I had chosen for this project, the more I knew that these were not the right papers to use this time.
   Sometimes the story behind a page takes precedence over a traditional theme. This two page layout was just such a case. In the photos I had picked, my husband is pushing a raft up and down in the water to create waves for my son to play in. My son has come to refer to this as the Daddy wave machine. So rather than use traditional papers with a sun or pool theme,I decided to make things look a little more mechanical.

I chose a metallic silver card stock as the base. Splattering it with Sapphire blue glimmer mist gave the appearance of water. I staggered the photos in a diagonal line across both pages... giving it the appearance of movement, like waves moving up and down.I painted some Maya road gear shaped chipboard pieces with silver acrylic paint. I used a tuxedo black bic mark it to outline the cogs and gears. This gave it a little more detail and helped them stand out from the page a bit more. To make the word " wave", I hand cut some letters from the cover of a paper pad, then wrapped them in foil. I used Stream alcohol ink( from ranger) to give the turquoise color. I visually anchored the photos to the page using strips of recollections paper. and hand stitching. To make the appearance of waves in the machine, I used a template to trace a wave border onto a piece of blue textured carstock. it's been in my stash for awhile and was actually the only thing I used out of my project pack.

I used the same border template to make the journal strips. I traced it on a scrap sheet of white card stock, then moved the template down a bit and tracing the border again. I do recommend journaling before you cut out the strips. It makes it easier to write.

Wednesday, March 30, 2011

Scrap Our Stash Pagerize Challenge #8

When I was a child, I learned my times tables by rote memorization. I recall hating it! While it did work for me, when it came time to homeschool my son, rote memorization was just not his way. He is always in motion, constantly chattering and just seems to need to "do" to learn. So we opted for some multiplication games. I think maybe it takes him a little longer this way than if I made him sit down and memorize everything. Then again, maybe not, because he'd fight me the whole way. Either way, we are having a ton more fun together. I documented it with this page. We are playing multiplication UNO. It's the same as regular UNO only you choose a multiple and work through it as you play. For example, every number card you draw is multiplied by 3. So if you  play a four then you multiply it by three. When we first start out, my son gets to use a chart. As we advance, the chart goes away. He sees the problem, hears the problem and says the problem and his hands are active. It's a win- win scenario!
Pagerize this Scraplift #8- of Helena

White acrylic paint with doodled black pen made a great border for this page.I then cut some K and co. ticket style border strips apart and used scraps of Sasafrass and crate paper as accents. The brown ribbon is unknown. The scallop was a scrap of a crate paper border. I inked a Sassafrass paper whimsy card. It reminded me of the symbol for multiplying. I added some patina glimmer mist for some fun flair.