Showing posts with label Fancy pants. Show all posts

Friday, May 25, 2012

LOAD512 progress report

I know I said I would check in after the weekend. Here it is, Friday already. It may seem as though my week went fast. In reality is felt slow but busy.  As far as how last weekend went, we beat Diablo 3. We had a great time but all of us lamented upon how short the game was. I did manage to keep up with the LOAD prompts. I am still keeping up in general, though I must admit that I am tiring out a little. Part of that may be how the week went. Nothing bad happened. We took our car in to get bodywork done. It's now repaired. I had the usual housework to do ( which I LOATHE). I worked on assignments for SNR mag.My son finished off last year's homeschool curriculum. This was really the big event of this week. He has been working so hard. Both of us are a bit mentally exhausted. So, I declared we should take a little break before summer term sets in. We homeschool year round and allow for flexible breaks as needed.

What I am now looking forward to is a nice long weekend with my husband. He has a three day weekend. It's still raining here. It has been steadily for days. So more than likely, we will watch a movie or two, play games and I will scrapbook. Sounds delightful to me!

Now I will share a LOAD page with you before I go bake some blueberry bread with my son.

Not every page you make during Load is stunning. Many are quick, but fun. That was the case with this page. This was based from a sketch we were given and it came together pretty quickly for me.

Patterned paper: Basic grey, Fancy pants and Crate paper
twine: twinery; chipboard: Crate Paper
other: cork, sequins, tickets


Part of the speed of making the page came from the pre-made kit. The paper had been grouped together in a game themed kit with a few matching embellishments. I was then able to add quick touches like the cork and twine. All of which supported the theme of my son shooting cork guns at the Easter fair. The cork letters were simple to make. I have thin sheets of cork which I got from an office supply store. I did hand draw the lettering, but you could easily use a stencil. The cork is thin enough that I was able to cut it with scissors.

The moral of this LOAD page...making pre-made kits is not a bad thing. I store much of my paper this way. It allows me to choose items quickly and get down to the business of making pages. Consider making some of your own kits this weekend and see how far they take you!


BTW,If you haven't had a chance to check it out, the latest volume of Scrapbook News and Review magazine is available. My first ever article is inside along with some wonderful pages from yours truly and fellow staffers. I saw some great tutorials to try my hand at, some of which include  mixed media techniques I hope to adapt to my pages. Stay tuned to see what unfolds on that front.


Saturday, March 10, 2012

What's Your Trend?

 I recently realized that I have certain techniques that have become trends. I am not necessarily talking about industry trends. I am talking about the trends you may see in the way that you work. I have tried a lot of new things over the past year. Some of those things have become staples in the making of my scrapbook pages. Misting and paint are one of those. I hardly make a page on which one or both are not present. So much so, that many of my friends now identify a page as truly me when they see the mist and paint. Last year, I really felt the need to hand stitch on quite a lot of the pages I produced. I now find that I am not hand stitching quite so much these days. My latest love is to use pen to outline the letters on my titles. I saw it done during a Masterful Scrapbook Design Seminar. Now I hardly feel a page is complete without it.
Let's Scrap sketch 1-4-12 ribbon-jillibean soup, glimmer mist-fairway,sapphire and tiger lily,SEI ink blue ink, Fancy pants to the moon papers,Amer. Crafts thickers-orange alphas,My little Shoebox tiny type alphas, Sassafrass green alphas, K and co. star chipboard sticker. superhero bands- from our egg dying kit, tags made with toilet paper which was embossed, inked and cut to fit the tag.
Who knows which techniques will become a regular part of your design style or which ones may become your scrapbook trends. The important thing is to observe your process. As you do so, you will learn more about who you are and the things that work for you. This will be a big help in developing your confidence and in making your scrapbook budget go farther. You will know which supplies to buy, because you will know the supplies you use most. So now, take a look at your work and ask yourself what your scrapbook trends are.

Sunday, August 7, 2011

A Kitty Comparison Part One

  Anyone who has pets will tell you that each pet has their very own, unique personality. My two cats are no exception to that rule. Each of my cats prefers to be held and cuddled in different ways. I decided this might be a good thing to document. So for once, the idea for the layout and the journalling to go with it came before the photos.  So last fall, I staged some photo ops with my son and both of our cats.
  I did get around to making one of the the pages last December. In the coming days, you will get to see that page as part of my post for Scrap Our Stash. For now, you'll have to be satisfied with seeing the page about Sweetpea, my female cat.
Sketchy Thursday's 8-4-11 sketch
Basic Grey max and Whiskers collection: Stickers,
papers and trim
Maya Road heart
Twinery twine in cappucino
Fancy Pants alphas
white acrylic paint
Smooch Spritz in spun sugar
DMC floss

  Sweetpea is one of those cats who can't get enough time to cuddle with you. You can hug her, carry her around the house in a basket, throw her over your shoulder...whatever the method, she just wants to be close to you and she is happy. Sometimes though, as in the photo, she can be a bit of a distraction during school work. She has a tendency of climbing onto you and then sort of draping herself over your shoulder like a scarf.
  In the next few days, you will see the post with the layout about Boo. He is a little more aloof than Sweetpea is. He prefers to hang out close by. When he does want to be held, he wants to be held like a baby being rocked. GO Figure! So stay tuned...

Sunday, July 24, 2011

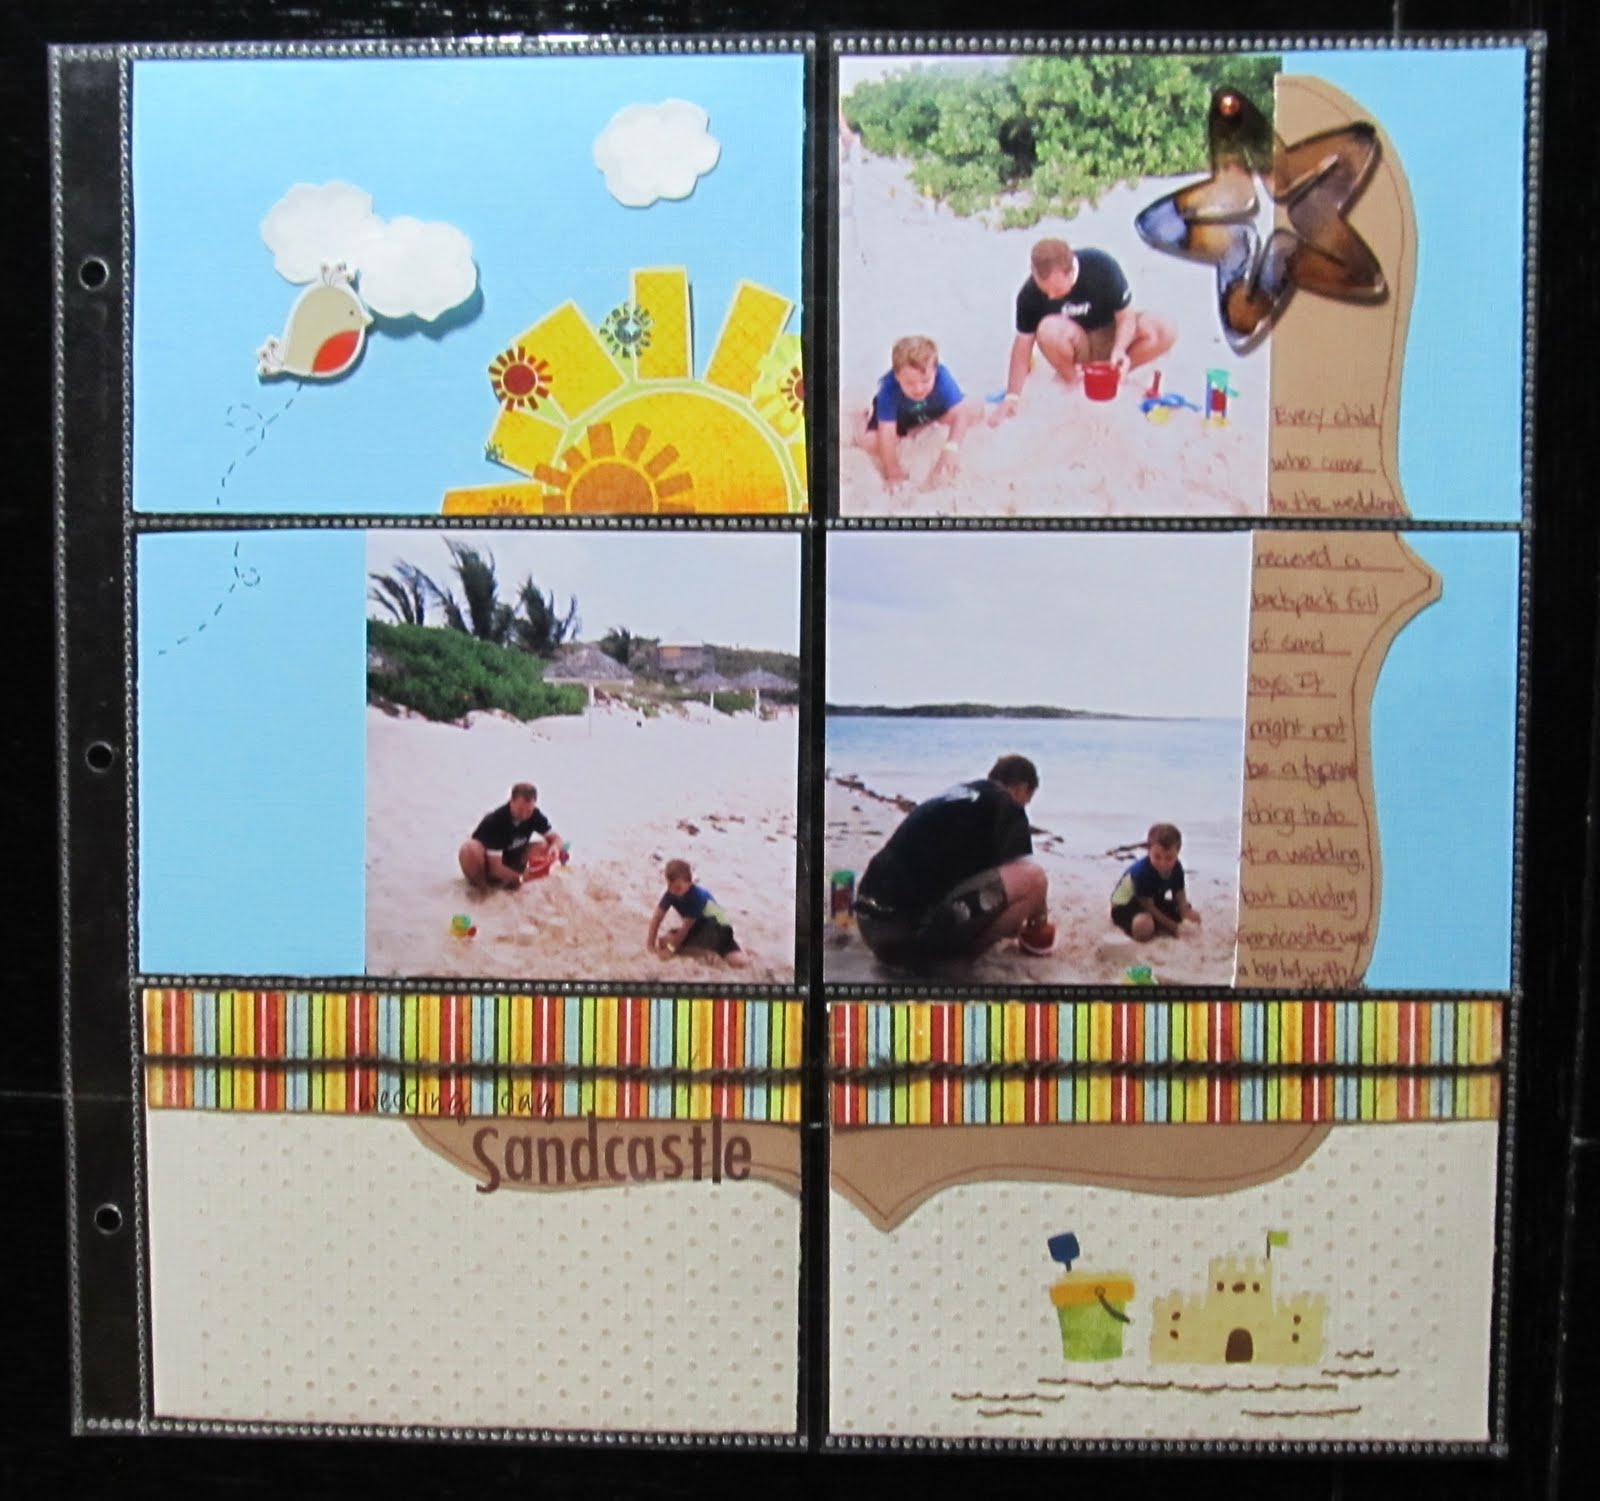
Wedding Day Sandcastle

    A few years ago, We were invited to attend a beach wedding. It was a lot of fun, though I will admit it felt very odd to attend a wedding dressed in a bathing suit and beach attire. My son thought it was awesome. He hates to dress up. The bride also made sure all of the kids who attended would receive a backpack of sand toys. The sand toys kept all of the kids( and my husband) occupied while we awaited for the wedding to start. It was a definite win-win scenario!
   I left my camera at home since the wedding was at a beach. I opted for some disposable waterproof cameras as I had no idea what we might encounter in regards to sand and water. When I began scrapping these pictures, I decided to try some of the 4x6 pocket sleeve style page protectors rather than the traditional 12x12. I had received a package of them for free with an album purchase.I figured this would be a great opportunity to use them since the photos were all standard 4x6 prints. I found there were a lot of pro's and cons to using these page protectors. You really need to plan where these will go in your album as the pockets are on both sides of the page protector. Using the photo sizes the pockets are intended for makes things a lot easier. I think If I had used one of the kits, like the simple stories line, which are designed for these types of page protectors, I would have had a much easier time. Once I got going though, it made for a quick and easy page.
Items from my July counterfeit kit:
Fancy Pants Paper and rub on's
Making Memories alphas
not from kit:
Jillibean soup twine
dmc floss
DCWV chipboard bird
Studio G stamp in white inke with clear embossing powder
Coredinations CS embossed with swiss dots folder and sanded
Colorbok CS
Maya Road Acrylic starfish coloured with eggplant and ginger alcohol inks

I did crop the 4x6 photos down. Not cropping them would have allowed me to just slip them in the pocket. I also chose a Pagemaps sketch, which meant it took a little more time and thought. For a faster page, I could have just decorated 4x6 cards and journal spots and slipped those in. On a positive note, I was able to use scraps for almost the entire page!

Shown above, are the backs of some of the 4x6 blocks. The white sections are the photos. You can also see how I covered page scraps that would otherwise have had gaps or sections missing with other pieces of paper layered over it.
 I could have left the tan paper and white clouds plain. However, embossing them gave just a tad more texture to the page. The sand coloured Coredinations cardstock was embossed with swiss dots using my texture boutique. I lightly sanded it to reveal the slightly darker core colour. I chose to use white ink in a cloud shaped stamp with clear embossing powder to add a subtle lining to the clouds. While these would have been just fine plain, this tone on tone embossing gives it a more finished look as does the hand stitching under the sand castle rub on.
 Now that I have the hang of working with these type page protectors, I will certainly consider using them more often. I think I will try some soon with one of the kits that are designed for these. Maybe then, I will find I like them even more than I do now.
 

Monday, July 18, 2011

Cool...Like a Fool in a Pool

  It's a fun title. The rhyming sing song chant of it sort of gest you amped up for a fun scrapbook page. It's one of the rub on titles from Fancy pant's beach bum line. It was perfect for these shots of my son and husband in the pool. My son was actually being quite the silly fool on this particular day. Apparently, it's quite fun to swim underneath a waterfall...which he then decided to do over and over again. I guess it's a kid thing. My favourite part about these photos is how my husband is always nearby and smiling. He's not one to pose for photos very often ( partly because I take too many photos). Quite truthfully, these are candid shots of him watching our son...which makes the shots all the more special to me.
  I went a little out of my comfort zone for this page. I chose to try some free collage software recommended by Club CK. It's called Photovisi.You just go to their website, pick a collage and add photos. Then you can move your photos around and edit it.After you are done editing, you save the collage to your computer and print.The only downside is that when you print your collage, there is a small watermark on one corner. I cleverly hid it with the ric rac trim and swimsuit style banner.

Making Memorie sabrina frames, cut and painted turquoise
dmc floss
twinery twine in carribbean
Fancy Pants paper and rub on
maya road Ric rac
Basic grey brads

The rub on and swimsuit trunks are from my July Counterfeit kit. I fussy cut those swim trunks from some of the fancy pants paper. The photo corners were my son's idea. I had scraplifted this page from Kathleen Summers ( see her page here- Fabulous 4th). Her page has photo corners. looking through my stash just did not reveal the right thing. I had this MM frame from the Sabrina collection and my son made the comment that it was a shame it wasn't blue. This gave me the great idea to paint it with turquoise acrylic paint. I cut it apart and did just that. It left enough pieces for use of my second, complimentary page.

We R Memory Keepers chipboard sign
Maya road chipboard brackets with yellow acrylic paint, gold pen, and diamond stickles
We R Memory keepers eyelets
ATD sticker
American crafts rub on alphas
basic grey brads
  This is a page of my own design. I placed the photos, in what seemed to me, a pattern that reminded me of the slide's shape. I also chose the road sign for that reason. I used scraps from the previous page with more fussy cut swimsuits. I wanted brackets to match the sign, so I painted them yellow and used gold pen.
  I can feel really good about these pages because I used up several things from my stash that, before now, I had no clue what to do with: the frame, bathing suit patterned paper, and the road sign. Combining the travel and beach theme in my counterfeit kit really helped me see these products in a new way.

* also submitted at Scrapfit for WWU#9


Friday, July 15, 2011

The Magic Mirror

  We all have those papers we don't know what to do with. It has been suggested that I should purge my stash and get rid of them. I find it hard to do. One reason being that I would hate to take the time to do that. It's time I could spend creating. The other reason being that it's sometimes those odd papers that end up being just the right thing. Take Graphic 45's Halloween in Wonderland papers. I won a pad last year. It's one of those papers that has a nice weight and quality but that frankly, is just not my normal style. I used some for a swap hoping for inspiration. I still had a lot left. So there it sat. Then last November, I found the perfect photos for using some of the paper up. Or rather, the opportunity to take photos that would compliment the paper arose.
  We were waiting in the kid's fitting room of a department store. The attendant had gone to get my son some more pants to try on. In the corner was this fun house mirror. As my son began making faces in it, I snatched my camera out of my purse and began snapping away( I never leave the house without lip gloss and the camera). All I could think of as I was taking the photos was the silly Alice in Wonderland paper. The layout was taking shape in my mind right there. I guess that's the sign of a true scrapbook addict. LOL
  The first page was made last December shortly after the photos were taken. I had 2 sheets of this tea party paper. I took one, cut out the center square and flipped it to reveal the pattern on the back. I used scraps of black card stock to help adhere it back together. By allowing some of the black card stock to peek out, I was able to roll it and tear it to create the look of a window.
Graphic 45 Halloween in Wonderland papers
flowers made with Pink Paislee Artisan tape and metal buttons
title cut on Cricut with CK Opa font
matchsticks with the heads cut off for Club CK challenge to use sticks

Some of the elements were fussy cut from other papers. I cut the heads off of matchsticks and glued cut embellishments to  them.
  Sometimes, I don't make the second page right away. If I am not making a traditional two page layout, I may save the photos for a later date. Sometimes I save them for a specific challenge or for when they inspire me again. I just completed page two this week.
pagemaps sketch
Graphic 45 Halloween in Wonderland papers
Basic Grey brown notebook paper and black brads
Making Memories button brads
Colorbox Chestnut roan ink
ribbon unknown
Little Yellow Bicycle tiny type alphas
Fancy pants brackets

I saw the song challenge for Scrap it with a song and I thought I could alter some of the lyrics to make a great subtitle for this page. This week's song is by the Police..." Every Little Thing She Does is Magic." I chose to use the subtitle of " It's magic" to fit in with the Alice and Wonderland theme of the page. Seeing this particular challenge had made me want to go back and complete page two. If you get in a rut, scrapping photos or challenges that you find interesting are often a great way to find your creative spark again.

Wednesday, June 8, 2011

One Man's Trash is A Scrapper's Treasure

   Lately, I have been experimenting with a more artsy side in my scrapbooking pages. It's not one that works with every page I do, but in some cases, I think it lends a wonderful tone to the story of the page. This is one of those pages.
  I have the misfortune( or perhaps fortune) of having 3 pairs of jeans that have become worse for wear. So much so, that I retired them quite recently. Much to my husband's dismay, this did not mean I threw them out. On the contrary...they have found a new life as a scrapbooking supply. After all, he doesn't want for me to go out and BUY any denim for a page, right? So when I started pulling supplies for this page about my son and husband tossing a football around our patio, the scrap denim was one of the first things I chose.
   The next supply I gathered up was a small piece of bubble wrap. The previous inhabitants of our rented condo were gracious enough to leave me a roll in our top closet. I like to use it every now and again to stamp with paint onto a page. I think it was quite considerate of them to supply me with enough of it to last quite awhile.
   Now that leads me to the next supply. I am sure you are wondering about traditional things, like patterned paper or rub ons. We'll get there...just not yet. One man's trash is another man's treasure, right? Which leads me to my next choice....cardboard. I took a little of the box my recent scrappy goodness arrived in. USPS boxes have this wonderful tiny corrugated pattern inside, once you rip off the outer layers.
  If you are like my husband, you may have a strange look on your face, especially given that, when  asked about what I was doing, my response was that I was scrapbooking some photos featuring images of him and our son tossing a football around the patio.  I can't imagine what he was thinking as I ran around the house cutting up jeans, stamping them with paint and bubble wrap and then with the utmost precision, ripping cardboard. Perhaps, he is wondering why I ever bought traditional scrapbook supplies. LOL I am sure you are quite intrigued about what I created as well. So here it is:
Sketch Inspiration #223
Scrapfit Workout#45-around the house
Paper issues submission-for the guys
Fancy Pants rub ons
Cosmo Cricket football tag inked with colorbox chestnut roan
Colorbok star epoxy sticker
Basic Grey brads
Fancy pants dot border cut from a transparency
Basic Grey mini marks alphas
Homemade mist-walnut ink with silver paint
Candy Apple red glimmer mist
white acrylic paint
denim
cardboard
DMC floss

I splattered some Candy apple red glimmer mist along with some homemade mist onto the page.I used some staples to attach the denim scraps. I had a handy chipboard template for the bracket which I hand cut from the cardboard( after I sprayed it with archival mist). I then began applying the more traditional scrapbook supplies. It's a fun page. The cool part about it...these photos all show my husband facing left. When I make page two, they will be photos of my son will be facing right...just like they are IRL tossing the ball. I am not sure quite when I will get to page two though. My black evening bag broke this weekend. SO I am off to recycle the gazillion black beads and wonderful hardware off of the bag. Wonder what I can make with those things....

Sunday, June 5, 2011

June's Counterfeit Kit

   It's that time again! Like a little kid, i have been eagerly awaiting the reveal of this month's Counterfeit Kit Challenge. While a part of me know's the things I will be using are already a part of my stash, another part of me is excited. Putting these kits together is almost as exciting as receiving a kit club in the mail! Those of you who have followed along with my other kits will not be surprised to see that, as usual, I went overboard as I shopped my stash. My only justification for that is that A. I did not spend any money in the making of this kit and B. I always intend on getting the most that I can out of it. Last month, I was able to make seven pages from my kit's supplies. This month, since I have no plans to travel and DH has a few paid holiday to burn, I hope to get even more pages done. Let's see if I can top seven pages.
   As for the kit itself, It may be a bit of a challenge with so many floral accents. Since the kit is styled after Burlap and Buttercups June 2011 kit, which has a slight summer tone, I am hoping I can utilize these summer florals in some masculine pages by playing up the colour palette. I got as close to the kit as I could in paper pattern and colour. I chose not to use any butterfly accents. Should I make any pages where I wish to use a butterfly, I shall cut one out of the Patterned paper from the kit.
Papers: turquoise- from the Best of K and CO.
Basic Grey basic-ledger
Crate paper restoration-Slip Cover
Crate Paper restoration-doilies
Sassafrass- Indie Girl-Pocahontas
Pink Paislee 365 degrees 6x6 pad
frame- Making Memories Chloe's Closet
Maya Road chipboard album-classic scroll frame
Maya Road Signature ribbon/trim in blue
Twinery Baker's Twine in Pea Pod and Caribbean
Sassafrass In stitch blossoms in kelly green,kraft, and vintage rose
Jenni Bowlin die cut journaling cards
Scenic route Garden grove laebls
Little Yellow Bicycle stick pins
Fancy Pants Write Now Rub ons
K and Co. fabric brads
Making Memories poolside brads
American Crafts thickers-Forest
Pink Paislee 365 degrees rub on
Pink Paislee 365 degrees borderlines


   You may be wondering about the chipboard album. I am not one to make mini albums, though I do greatly admire them. What I prefer to do, is to take the album apart and use the wonderful shapes on my pages. I thought the scroll pattern of this mini would make a wonderful substitute for the chipboard frames in the original kit. I can also opt to cut my own chipboard frames if need be.
  I also opted to make the add on summer kit. I chose a variety of papers from the scenic route grab bag I had received recently. They are the types of papers I might not reach for right away. I felt they complimented the papers from the main kit and that with the addition of the turquoise paper, the colours had a very summery feel to them. I do realize that there was only one bottle of mist in the original add on kit. However, lets face it, I LOVE to mist. So we all know it's highly likely for a variety of these mist colours to end up on a page.
papers: Sassafrass Indie Girl- free spirit
Sassafrass Indie Girlaffection
October Afternoon- patio umbrella
Scenic Route - Providence:Green st,Franklin St. and Scrap Strip
Scenic Route Sonoma- Plive Ave.
Making Memories Paperie greenhouse spiral journal book
Pink Paislee 365 degrees flip notes
Sassafrass paper whimsies- beatnik buds
K and Co. chipboard frames
Creative Memories black alphas
Making Memories simply stated rub on alphas
glimmer mists: patina, sapphire,tiger lily,viva pink,meadow green and candy apple red

  For both the main kit and the addition, I tried to choose papers I might not normally reach for. When I make these kits, I can often perceive new options for the papers and patterns that I might not have seen before. I also made it a point this time to choose some embellishments from pre-opened packages. I am challenging myself to try to finish those packages off. Stay tuned for further posts showcasing pages made with my June Counterfeit kit...

Sunday, May 29, 2011

Summer is here!

 What can I say...summer temperatures are definitely here. It brings with it trips to the beach, time at the pool, and afternoon thunderstorms with cooling rain. I think it's time to break out the squirt guns and get some great summer photos. It all sounded so wonderful...until I realized I still had last year's summer photos to finish scrapping. Not only that...I still had last year's summer themed papers to use up! Time to pull out those summer albums and finish up the last few pages. 
   The page I am going to share with you today is actually page two of a layout I did last summer. I scrap in an odd pattern sometimes. While my albums are chronologically organized, I scrap the photos that I feel like here and there. Sometimes, I will complete a full  two page spread in one sitting, while other times, I will do one side of the two pages. I save the photos and papers I use right there inside the page protector. It's nicely organized and things don't get lost. The only disadvantage to this method is that, as my style and skill become more defined, there is sometimes a different look to the 2nd half of the page if I wait too long to scrap it.
  Anyhow, here I sat with scraps from page one...papers and embellishments from the Fancy Pants Rusted Sun collection. I had 4 photos all 3 1/2 x 5 in size. I think part of the reason I had not gone back to this page is that I had been struggling with how I wanted to place these photos onto the page. For whatever reason, I wanted something more than a usual grid with 4 photos. I just didn't know what I wanted to do exactly, until I came upon a wonderful sketch from Sassy Lil Sketches. I saw the circular element on the page and instantly knew I wanted to cut one of the photos in a circular shape.

Sassy Lil Sketch 5-21-11
  Once the photo was cut, I realized the page needed a little something more. I wanted to continue with the sun and beach theme, but did not have the lovely yellow paper from the rusted sun collection. I chose to use a Martha Stewart plaid style stamp and some orange ink on yellow paper. It closely resembled the pattern found on the suns in paper I had already chosen to use. I then decided to add some detail with white opaque marker and brown pen. I remember using pens and markers more often in my early days of scrapbooking. I have happily found them once again. They are such an inexpensive and quick way to add just the right something to many a page.
  Since the two sun shapes seemed to be such a large attention grabber, I chose not to add a lot of other design elements to the page. I am rather pleased with the way it brings your focus right to the photo of my son. Now…I must go and try to finish off some of those other albums. It seems I have several that need just a few pages here or there to be called finished

Saturday, May 28, 2011

Counterfeit Kit Challenge's May blog hop

  Welcome to the Counterfeit Kit Challenge May Blog hop! You should have arrived here from Jennifer C's blog. If you have just found the hop or are lost, head on over to the main page at the Counterfeit Kit Site to get on the right path.
  If you are like me, you love Scrappy supplies and getting packages in the mail. Unfortunately,my budget just does not allow for me to purchase various kit clubs and all of their wonderful add ons. That is where the counterfeit kit comes into play. Each month, a kit is chosen and we are invited to do our very best at copying it with supplies in our stash. I admit that I love shopping my own supplies. Participating in this challenge has really helped me see new paper combinations and various ways of extending older supplies to get a new look. The cool part about this challenge is that I can use my kit to play on other challenge sites as well.
  This month's blog hop challenge was to choose some inspiration from a manufacturer's blog. It sounds simple enough, but let me tell you, it was actually quite a challenge to narrow down what I wanted to use as inspiration. I finally chose to scraplift a layout from Maya Road's Creative Corner. I especially loved the use of Kraft paper along with the unusual banners at the top of the page.

Deeply Grateful
Page by Karen Grunberg made for Maya Road


   One of the first obstacles for me in making my page is that I do not own a scallop edge border punch. I could have opted to cut it on my Cricut, but instead, I chose to trace my own from a piece of shaped chipboard( I keep a few covers from shaped mini albums to use as templates). I used a hole punch and paper piercer to add a little more detail to the hand cut scallops. Paper scraps inked with Colorbox's chestnut roan ink took the place of ribbon. I liked the diagonal flow of the page and chose to add to it with glimmer mist splatters. Buttons and the leftover dots from punching holes in the kraft paper hint at confetti. To make the punched dots a little more interesting, I used a pen to doodle irregular circles around them. 

all items from May counterfeit kit except for:
twine from the twinery
K and Co. alphas and stickers
glimmer mist in candy apple red and electric blue

This was my first time making faux stitches with a paper piercer and pen. I will say that I do like the effect and it's a great technique to use if you are short on time or feeling lazy ( like I was). I did use a few items not in my original counterfeit kit. I chose to add in some twine and some K and CO alphabet stickers. These stickers came with some birthday themed hats, presents and cupcakes. The package is a few years old and the stickers were not sticking well. I used glossy accents on them which served to update their look as well as keeping them on the page.
 Lately I have been pinning a ton of ideas to my pinterest page. Seeing this completed layout is a reminder to me that using the inspiration I find can make for a wonderful page.If you are ever in a slump, a manufacturer's website can be the perfect fix. Now it's time to hop on over to Michelle's blog. Don't forget...don't just save inspirational ideas for later, find the time to actually use them! Happy Scrapping!

Thursday, May 19, 2011

Not Yet! Then I Should!

  As I was flipping through photos yesterday, I came to realize that I have yet to scrap a page about my Dad. He's sort of not the kind of person that likes to get his photo taken( kind of like me). So the two photos I found of him are quite the rare treasure.
Sassy lil' Sketch 5-14-11

  I had specific reasons for choosing the elements I used for this page.Take the camouflage flap for example. Ever since I was little, my Dad has a camouflage hat on his head every time we go outside. ALWAYS. I think it might be weird if he didn't. He has had one ever since he was in the Marines. The Camou flap reminded me of that. I had just salvaged the flap from my son's canvas backpack( the bottom of which was ripped up beyond repair). I chose the blue plaid paper by Fancy pants because it reminded me of the shirts my Dad liked to wear when I was a kid. Embellishments and trim from the Making memories Just Chillin' line added a nice masculine touch to the page. The journal spot was made on a whim by me. I have always wanted to use my mists and a mask to create one. I just got some new masks by Tattered Angels from their Heidi Swap collection. So I was quite happy to use one here with some sapphire glimmer mist.
  Though a lot of people looking at this page would not know the meaning behind some of the elements chosen, the page in and of itself is a nice tribute to my Dad. I invite you to consider choosing page elements that may have significance to you. Without realizing it, the tone or feeling behind those choices may well translate into the page itself, giving the viewer a deeper feel for the page's subject.

Tuesday, May 17, 2011

Some Belated Mother's Day Inspiration

  This month, Artastic's challenge involves a Mary Cassat painting in honour of Mother's day. While I am a big fan of Cassat, I found it a little difficult to find just the right photos for this challenge. I scoured everything I have. Mom and baby photos of my son and I have long since been scrapped. I did find some vintage photos which I have been meaning to get into albums, so I chose one of those. It's a photo of my grandparents holding my uncle.
Pagemaps sketch
papers-Cosmo Cricket and October Afternoon
Crate paper rub on and chipboard border
Jenni Bowlin stick pins
vintage buttons
lace unknown
title-fancy pants rub on
K and Co journal tag

I love that I was able to use vintage buttons from my great-grandmother's button box on this page!I feel it's kind of a nice touch and adds a little memorabilia as well.

Friday, May 6, 2011

Only You Can

This was going to be another simple page about my son and his boyish habit of playing with sticks. However, I decided to switch out the title. Something that simple can lead your journaling down a different path. in this case, that path led me to describe some of my son's best traits. I also, inadvertently, was able to place a little message in the text. I misspelled strength which led me to use acrylic paint to cover the error. It looked a bit unbalanced. This led to adding paint in other areas of the circle, including over some of the other words. I chose to use the words " capture, your and strength." Which leads to the little message for my son...Only you can capture your strength.

Pencil Lines  Sketch 236
Contents from my May Counterfeit kit including:
Sassafrass borders
Buttermilk colour acrylic paint
Recycled chipboard stars embossed with Swiss dots
Papers-My Mind's Eye, Fancy Pants, Sassafrass
Alphas- basic grey mini Marks
Sassafrass

Thursday, May 5, 2011

Quickly goes the page...

which one is inspired to make. I know I made a lot of great choices in my counterfeit kit because it was easy to choose photos, supplies and a sketch. The next thing I knew, this page had been made.
Sassy Lil Sketch 4-28-11
stars are recycled notepad cover, embossed with swiss dots
paper-My minds eye,sassafrass, fancy pants
I rock jewels
Sassafrass borders


My son is playing with sticks. Even my husband loves to play with sticks every now and again. Fun lives in simplicity sometimes. I chose the quote because I felt it was pretty apt. It reads: " A treasure to a little boy does not consist of money, gems or jewelry. He will find far greater pleasure in the wonder of a rock, pebble,stick or beetle." Author Unkown.

May's Counterfeit Kit

  Here we are in May...already! Boy this year is flying past. This will be my 3rd counterfeit kit. I am very happy to be participating in this challenge. I am definitely enjoying shopping my stash, trying new ways to make my own embellishments and just making pages with my monthly kit. May's Counterfeit  kit was an easy one for me to make up. I think it's going to be easy for me to use a lot more from it as well. This month, the kit is a fun, summer kit with a  playful childlike tone from Work in Progress. So without further ado, here is my version:
papers: Fancy pants- It's your day(stripe)
Cosmo Cricket-Chaplain ( large black page with number)
My Mind's Eye- red polka dot
Basic Grey- life of the party-confetti cake polka dot
Basic grey- life of the party- how you' ve grown-rulers
basic grey- life of the party- noise makers-green with plaid dots
Sassafrass-anthem
Sassafrass anthem-translate

Alphas;  Basic Grey life of the party
Cosmo Cricket- flour sack

MISC: Basic Grey life of the party brads
Sassafrass paper whimsies cards
Fancy pants yellow ric rac
Lil' davis designs castaway rub ons
Maya road chipboard stars
Sassafrass cardstock stickers

Of course, as many of you know, I simply can not resist a good add on. Really, there is no excuse not to since I am shopping my stash. So I jumped in with both feet when it came to making up a boy inspired kit. For whatever reason this month, the number theme seems to really be a big thing for me. I used a lot of papers and embellishments with numbers of various shapes and sizes. It will be interesting to see how these gets used on pages throughout the month.

Paper: Crate Paper-Toy Box-playdate
Crate Paper Emma's Shoppe- playhouse
Crate paper Toyr box-build
Echo Park Sweet Summertime- raspberry delight
Echo Park Sweet Summertime sunny spots
All other papers-Sassafrass

Alphas- K and Co. Brenda Walton chip box
Sassafrass pocket full of rosies
Sassafrass Woodland Whimsy

Misc: Crate Paper toy box borders
Crate paper toy Box chipboard
Studio Calico numbers card
Sassafrass Paper whimsies-flowers
ribbon and trims-unknown
Maya road wood bongo numbers
Fancy pants it's your day buttons
Sassafrass in stitch blossoms-deep blue
Sassafrass brads-vintage gems
Crate Papers restoration collection brads
Sassafrass felties-June bug
Basic Grey woolies-wonder
K and. Co ticket border remnant
K and Co. frame

You might recognize a few things from previous kits. I decided to challenge myself yo use things I put into past kits but never used. So let's see how I do. I am off to play...

Thursday, April 21, 2011

Such a Glorious Feeling

 That phrase really stuck out at me when I saw the movie poster featured at From Screen to Scrap's challenge blog.
                                                      
It is always a wonderful feeling to have the rain cool you off on a hot day. I make it a point of taking my son for walks during the rain so we can enjoy it( barring thunder and lightening of course). I have wonderful memories of puddle stomping with my Grandparents and I hope my son will carry on this tradition with a child of his own someday.
  Given that this is something we do often, I will admit that this is not my first page about walking in the rain. In fact, I made the companion page to the layout I will share today several months ago. So I carried the paper and colour scheme over to this page with the fancy pants papers, glimmer mist splatters and red buttons.

The title is made from some older Creative memories letter stickers with glossy accents added for a "wet look". Since this is a companion page to another, I really didn't want the title to stand out too much. The red allows it to pop out of the journaling while still being a part of it.

Monday, March 28, 2011

On Top of Spaghetti

...all covered with cheese...yes, that silly song kept playing through my head as I made these next few pages. Silly as that can be, music can help bring about cool titles for a page. So I went with it. It worked well, as my son was also "on top" of what it takes to cook spaghetti and meatballs. He is becoming quite the cook and had insisted on cooking this for me and my husband.
These pages were made for the " you've been framed" challenge at the
Counterfeit  kit challenge blog using my March kit.


Cooking is a great skill to have. While I love him being just the age he is, I can not help but think that some day, these moments of learning to cook will be useful when he's out on his own.

Sunday, March 13, 2011

Scrap Our Stash March Challenge: Dusting off Inspiration

   When the  " Dust It Off" March challenge was announced  at Scrap Our Stash, I started rummaging through my stuff wondering what item I should dust off. Should it be the heat embossing tool that I rarely use? How about finally getting out my sewing machine? It has been sitting in my closet unused for years and I have always wanted to try sewing on paper. How about those stacks of snaps? I really had wanted them in so many colors and have used so few. As I continued to shuffle and organize my things, I came across a stack of old magazines, many of them dated all the way back to 2007. That's when a realization hit me. I always like to bookmark pages I want to scraplift. Yet...when was the last time I had done just that.
  Often times, a new magazine comes out, I get excited to read it and so I file the old one away to use later. The same goes with on-line inspiration. I see a page at a website or gallery and save it in an idea file on my computer. I just never go back and use the ideas I have gathered. So I decided that for this challenge, the first thing I would do, before dusting off my tools and supplies, would be to dust off some of my inspiration.
  My first choice came from the February/March 2008 edition of Scrapbooks ETC. It's " one more page you can put together in a  flash".

Fancy Pants papers, border and stickers
Creative Memories alphabet
Making Memories tiny type alphas
I really like these simple 15 minute style pages. The basic design bones are right there...just add photos and embellies and you are done., literally, in a flash. Making quick pages like this is helping me learn to spend less time choosing supplies. I make decisive, quick decisions and am able to scrap faster.

quick tip: If you have older sticker or alphas, update them with glossy accents(or similar product). Glossy accents is a clear adhesive. When you layer it over an older sticker or even a paper die cut shape, you can create those more modern epoxy looking stickers that so many of us love. On the page above, I dusted off some 8 plus year old Creative Memories alphabet stickers and added glossy accents to the top.

 For my second page, I chose to dust off some Internet inspiration. I am sorry to say that I do not know who made this wonderful page. I have had it for at least a few months in my computer file. Whoever you are...thank you for this gorgeous page to inspire me:

Now here is my take:


Cosmo cricket papers, die cut, and border stickers
October afternoon rub on letters, papers, and made with love sticker
Foof a la buttons
Bic Mark it in woodsy brown
 I chose to hand stitch versus machine stitch.I should have dusted off my sewing machine but I was a bit too lazy to drag it out of the closet. I used my 3-d adhesive to add a little pop to some of my fussy cut elements.

Quick tip: the words Cherry Pie in the title are actually the name of the paper. I often look at the strips with the paper name to see if I can use them on a page somewhere. I hate throwing anything out. In this case, they were exactly what was needed in the title.

Now, I invite you to dust off not just tools or supplies, but the things that inspire you. Share your projects with us here at Scrap Our Stash!


Friday, August 20, 2010

It Girl

Sometimes, it's hard to use pink when you have a boy. My only baby girl is my little cat, Sweetpea. So when I get the chance, I highlight her as a subject in the photo and go crazy with girly colors and bling!


For It girl, I chose to use a black pearlized card stock for the background and white pearlized cardstock for the mattes. DCWV's All dressed up collection was the perfect patterned paper. I layered it over ripped pink cardstock and inked everything with ruby satin colorbox ink. The left page is a sketch from Sketches for you. I painted some chipboard letters pink and used fruit punch stickles on the top. Painting your stash is a great way to make it work for you. Don't be afraid to be versatile. The word girl are colorbox punch outs which I used Glossy accents over. Glossy accents provide wonderful dimension and can easily update older stickers or die cuts. I used Making memories 5th avenue trim and sewed small pearl beads onto it.

The brads are K and company, Sassafrass and Basic grey(with stickles on them). The crown and Feather are basic grey rub ons to which I added stickles and perfect pearls. The journal spot is a Fancy pants rub on in just that perfect shade of pink. So while my son is in the picture, I can add lots of fun pink and girly accents by focusing on my cat.

Submitted to : Sketches for you
                       Scrapfit

Thursday, August 19, 2010

Using a Speech Bubble

  Recently, I came across a a challenge at ScrapWhispers to use a thought bubble. At first, I was a little unsure. However, when I printed the photos of the sea lions, I could just see the little girl sea lion asking my son if he would play. These Sea lions are in quarantine b/c they are new to the place my husband works at. He brought us to see them and they immediately perked up when they saw my son. It was as if they knew he was a little kid just like them. They walked back and forth...following him as he walked in front of their enclosure. When it was time to go, My son started protesting and then the little boy sea lion started barking at me as if to say " no...we aren't done playing yet!". It was all just so cute.


I wanted some fun paper for this page, so I chose Sassafrass. All of the paper is Sassafrass except for a tiny bit of Fancy pants where I journaled and matted the photos. For the thought bubble, I used a chipboard sticker which I  mounted on chipboard and cut out. The brads(except for the decorative ones) and the buttons are Basic grey. I inked the edges of the buttons and the papers with Autumn leaves red ink and colorbok inks. I love the bright Sassafrass in stitches flowers for this page. I did a little bit of handstitching as a small accent with some orange floss.There is an acrylic arrow just visible under the orange page protector. I wanted to keep it neutral but wanted the eye to go from the title to the journaling.This is sketch 213 from Scrapbook challenges.