Showing posts with label Deflecto. Show all posts

Tuesday, August 11, 2015

How to make DIY Bookmark for Erin Condren Planners


I started using my Erin Condren Planner back in July. Since then, I have been looking for ways to use it practically while also adding in some decorative elements. I discovered that I often easily lost my place within the planner. Yes, there are monthly tabs. My problem was that I wanted to quickly flip to the week I was working in and to any pertinent notes for that week in the back of my planner. The answer for me was to create a set of personal book marks using some of Deflecto's flexible pouches. The process is super simple. In fact, you can make a bookmark in less than 5 minutes.


Here is a closeup of the four bookmarks I created. I chose to put a few 3x4 pocket page cards from a recent Cocoa Daisy kit inside my pouches. The cards are double sided, so there was no need to worry about what to put on the back. Any3 x 4 inch pocket page card would work. You could also add family photos. The Deflecto pouches are sturdy and they remain closed. I am not worried about the cards slipping out, so I didn't feel the need to fuse the top of the pouch shut. Leaving the top open will allow me to change out the cards as often as I please.


As I mentioned in the video, you will need to We R Memory Keepers fuse tool to seal the sequins into the bottom of the pouch. The Deflecto flexible pouches are thicker than a page protector which means that using the metal ruler as a guide is not an option. The layers are too thick for it to fuse well. Set the metal ruler aside and use your glass mat or a cutting mat with a grid to draw a straight line free hand. Work slowly and steadily so that the Fuse tool doesn't slip on the glossy surface of the pouch. Do not apply to much pressure or you will cut the pouch rather than fusing it. At times, it may help to lift the tool and place it down again gently as you work across the pouch.

The Deflecto flexible pouches come in packs of ten. It's very likely that you won't need 10 bookmarks. I plan to make a few extra to give as gifts. They are so quick and easy to make plus there is the added bonus of being able to personalize them for any friends or family who also love Erin Condren Planners.


Affiliate links when possible. Thank you for supporting MSE.

Ready to create your own bookmarks? Look in your supplies for washi tape, ribbon and sequins to match your planner covers.

You can find the Erin Condren Coil Clip connectors at the Erin Condren Website under Planner accessories.


  Follow My Scrapbook Evolution's board Planner Love on Pinterest.

I plan to take the Planner Love class through True Scrap in September. I hope it will help me in finding that perfect balance between a practical planner and a decorative one. Would you like to join me?

Click here to view more details


Sunday, July 12, 2015

Quick and Easy Home Decor with Deflecto Craft Solutions


I have been on a bit of a kick lately. I have the desire to spruce up my home a bit. However, I am on a budget regarding both time and money. I needed a quick project that wouldn't break the bank. I grabbed a few of my Deflecto Frames and some scrapbook supplies and went right to work.

To be fair, I must confess that I am using supplies received in my capacity as a Deflecto Ambassador. I had a wonderful opportunity to work with several paper collections from PaperWishes. You could easily replicate the results with any scrapbook paper collection that you would like to use. 

The key to making the decorative frames quickly is to keep your design simple. Choose a frame in a standard size such as 4x6 or 5x7. Most frames come with a paper insert. If the  frame is not a standard size, use that insert as a template.Lay the insert over your chosen piece of background paper and trace, then cut it down to size. Using the insert means there is no need to measure.

This particular frame was featured with full instructions on the Paper Wishes site. You can view them here.


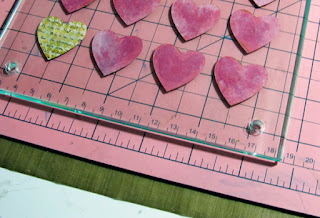
I also wanted to keep the second frame simple. I chose to use my silhouette to create a series of heart die cuts. These were all cut from the same piece of paper. Since this paper is double sided and coordinates, I merely had to choose one to flip over. I did add a tiny bit of glue to the back side of the hearts to keep them from shifting in the frame.


Quick Tip: The advantage of working with this style of clear acrylic frame is that you  can lay it over the top of a cutting mat. It is then easy to use the grid as a guide when placing the die cuts.


Quick projects like these frames make it easy to refresh your home decor without breaking the bank or taking up a lot of time. You can make a few in an hour or less. Keep them on hand and switch them out to match your mood or the seasons.


This posts contains affiliate links when possible. Please shop your stash first, but should you find you need something, consider supporting MSE.


Visit Deflecto to find a retailer near you or purchase supplies through Amazon.


Friday, June 26, 2015

Who is Ready for a Vacation? This Girl!


It's been a long tiring week full of blogging, planning and blogging some more. The work doesn't bother me but I know my mind needs a rest. When I saw the latest kit from Traci Reed Designs, traveling and rest were all I could think of. Sure, I have travel photos to document( and I will get to those) but really, I just needed to daydream a little. I don't have any travel plans on the horizon but that didn't stop me from making some new luggage tags!

DIY Hybrid Luggage Tags by Christy Strickler |Supplies Digital Kit: All year Round Destinations by Traci Reed Designs and Jady Day Studio; Tag: Deflecto Craft Solutions; Twine: True Hemp


The tags were super easy to make. All you need is an empty pouch, patterned paper and some travel themed die cuts. Digital kits are perfect for the tags because you can print anything from them, including buttons. It's best keep your tag relatively flat. Hence the use of the die cuts. You don't want anything lumpy that might get snagged on one of luggage carousels at the airport. Speaking of which, I did add twine to make the tags look good in the photo. You don't want  twine tassels when you tie these tags onto your suitcase. Trim all the ends. Loose twine can easily get snagged in a  machine. In fact, you might just want to replace the twine with a carabiner hook, a key chain cable ring or a combo of both. These tags would also be perfect for your kid's school bags. In which case, break out all the lumpy embellishments and twine tassels that you want.

Really, it's probably a good thing to make the luggage tags ahead of time. You and I both know that if a vacation were in the works, spending time crafting would be put on the back burner in order to pack. So even if you don't have travel plans any time soon, I say you should break out those travel supplies and create something with them!


This posts contains affiliate links when possible. Please shop your stash first, but should you find you need something, consider supporting MSE.


All Year Round Destinations from Traci Reed Designs and Jady Day Studio


Visit Deflecto to find a retailer near you or purchase supplies through Amazon.


The Deflecto Reversible Pouch can also be used to make a mini album.


Follow My Scrapbook Evolution's board Motif-Have Suitcase, Will Travel! on Pinterest.


Monday, May 11, 2015

A Super Hero Desk Sign with Deflecto Craft Solutions


This month's theme inspiration for Deflecto Craft Solutions features Dads and Grads. It's also the end of  my son's first year as high school student.Now typically, I know most people don't celebrate graduation from 9th grade. However, I wanted to give him a little something(partially practical) that he could use in the upcoming school term. Homeschool kids have the option of continuing on through the summer months and my son has chosen to continue on his computer programming lessons throughout the summer.

We're huge fans of the Marvel and DC universes, so I figured that a gift featuring a comic book hero  would be perfect for him. The cool thing about this gift is that it's perfect for anyone who loves superheroes whether they are Dads or grads from any grade level. So what exactly is this gift? It's a themed wet erase sign.


The wet erase sign comes as you see here. It's designed to work with chalk markers. You can decorate it with a drawing or jot down a to do list. Now I know what you are thinking. That's for an office not for a kid. A few alterations is all you need to make any kid(or dad) think it's cool.


The first step is to paint the base. You probably want to have a superhero in mind so you can coordinate the colors. We're going with a Batman theme, so silver works well. Use spray paint for a nice even finish. I used a metallic silver from Krylon and of course, I completed this step outside in a well ventilated area. The chalkboard slides out of the base. Remove it before you paint,then you can decorate the chalkboard while the base dries.


You are going to need something to create a trim or border along the top of the chalkboard frame. Washi tape or ribbon will work well. If you want something really sturdy with a nice metallic finish I recommend HVAC metal repair foil tape. Cut a strip long enough to go across the length of the chalkboard. The tape is really wide. If you like, trim it down just a bit, then adhere it to the chalkboard.


Choose a sticker or tag to decorate the sign with. I am using a clothing tag I saved from one of my son's t-shirts. Any super hero themed stickers would work.  To make your sticker or tag a little more sturdy, adhere it to a piece of chipboard and trim off the excess parts. You can then use liquid adhesive or hot glue to add it to the chalkboard.


The nice thing about being able to remove the chalkboard is that it makes it easier to write on. You might want to write a simple message on the sign before gifting it. Don't forget to include a pack of the chalk markers!


A little paint and a few decorations will give you a unique gift that your child(or dad) will be sure to love. After making one for my son, I am now contemplating how I might customize one for my own desk.


This posts contains affiliate links when possible. Please shop your stash first, but should you find you need something, consider supporting MSE.


Visit Deflecto Craft Solutions to find a store near you. Or look for Deflecto at Amazon.com.


Friday, April 10, 2015

My March and April Planner Pages

I never really got around to making my March planner page. I kind of got caught up in the excitement of creating. As much as I blogged, I still made more projects than I could find the time to write about. Being productive is great and overall, I am keeping up with Project Life this year thanks to my planner. I am still dipping my toes into the planner addiction craze, so to speak. Using the Project Life Planner requires me to make it a habit. I am becoming more comfortable with that habit and I think it's going to stick with me.

While I didn't decorate the March tab until this week, I did journal in the calendar section. I am still not 100% sold on decorating the calendar itself. Why, you ask? I think there are two main reasons: I don't always have enough space to journal in and I kind of hate the printed paper. I am taking all of this into consideration for next year's Project Life planner. I might need a larger size binder. I don't think that will be a problem since this binder remains at my desk. I use it to plan out the making of my Project Life pages not to plan my daily schedule in. I now know that printing the calendar on regular paper is unappealing to me. Next year, I plan to use cardstock.

Design wise, I seem to find it comforting to add elements in the center of the tab. I am still keeping things simple and using flat embellishments. My favorite new supply is the thin washi tape from Little B. I love the way it separated the patterns on the tab and added just a touch of gold.


I did change the way I store memorabilia and cards I plan to use each month. Originally, I had planned to use a paper clip. However, I found the clip sometimes left marks on the cards. I tried placing loose items in a paper envelope, but they kept falling out. I finally had my Eureka moment when I received some plastic pouches from Deflecto Crafts.  The pouches are 5x7 and fit in my A5 size planner pretty easily. The pouch only has a single hole in the center of one side. I thought this was a con at first. However, it was easy to punch holes with a simple school grade hole punch. I believe I could customize it to fit a larger size binder if necessary.


I wanted to see if I could decorate the plastic pouches. So far, washi tape seems to be sticking to it well with no signs of peeling up. I am finding that the planner is the perfect place to use up scraps or extra embellishments. I printed a few too many of the March Pocket Life 2x2 squares. They ended up being the perfect size embellishment for the pouches. I decided to see if I could use my sewing machine with the March pouch. It stitched through the layers of plastic and cardstock with ease. If you do stitch directly on your pouch, make sure to stitch close to the edge. You don't want to stitch part of the pouch shut and lose precious real estate for storing memorabilia.

For April's cover tab, I chose to step outside my comfort zone. I wanted a design that was different than the previous two tabs...something a bit off center. I also had my heart set on using an umbrella. Recently, I had gotten a stamp from my Pinkfresh Studio kit in which depicted an elephant floating away in the breeze holding an umbrella. Now was my chance to use it!


It turns out that planners are a great place to sharpen new techniques. Here was my chance to practice a bit more with coloring and shading stamps. I used a Faber Castell Big Brush Pitt Pen and some distress markers to do the primary coloring and shading. I was able to blend the colors a bit with some Yasutomo water colors. These are by far my favorite water colors as they have a touch of shimmer.


I decorated a second Deflecto pouch for April. This time, I ran the washi tape horizontally.


I used my craft knife to gently cut a slit through the tape so that the full pouch opening can be accessed. Instead of stitching the 2x2 cardstock square to the pouch, I adhered it with glossy accents. This seems to be holding well.


Using a Project Life Planner seems to be a good solution for me. I am learning to use it as my primary place to store memorabilia, specific cards I wish to use and notes for my pocket pages. I was frustrated last year whenever I discovered something I had missed and wanted to add to my Project Life pages. It was always such a paint to rework the layout design and often, I would just skip using whatever I had omitted. It doesn't look like that will be a problem for me this year.

Supply Options
This posts contains affiliate links when possible. Please shop your stash first, but should you find you need something, consider supporting MSE.


Visit Deflecto Craft Solutions to find a store near you. Or look for Deflecto at Amazon.com.


Pocket Life 2015: March Collection by Traci Reed


The elephant stamp was part of a Pinkfresh Studio's kit. I am not an affiliate of PinkFresh Studio but I am a kit subscriber. You can see my review of their monthly kit here.

The leprechaun die cut is a part of the April Floral bundle from the Hungry JPeg. I received this bundle from them and will be sharing projects made with it during this month.


Additional Resources

Previous posts including my 2015 Planner Pages

the My Scrapbook Evolution Planner Love Pinterest Board