Showing posts with label SEI. Show all posts

Monday, January 9, 2012

The Making of a Monster Shirt

  I have a very vague memory of making an iron on shirt with my mom as a kid. The memory is so vague that I am not sure if it ever even happened. Saying that makes me feel quite sad. So much so that I hope  my son manages to have more vivid memories of me. At the least, he will have tons of scrapbook pages to reference what some may believe is an over-documented childhood. Isn't it great to be a mamarazzi?!?!

  Anyway, When I saw Amanda's page for the Scrap our Stash Pagerize this challenge, I knew I had to lift it. I loved the dynamic look of the circles on her page. I also liked how the smaller cropped photos acted like embellishments to support the main photo.
SEI papers, Basci Grey Brads,DMC floss, glass beads
artsylicious green brad, Fancy pants star sticker
papr trunk alphas, basic grey woolie
Cosmo cricket chipboard arrow with souffle pen in white
colorbox black ink
   Can you spy my new favourite product? I began using them on my pages within the last few months. They are glass beads. I have some that have been in my stash for awhile now. They are sprinkled onto the word   "monster" and then adhered using glossy accents. The little black beads were salvaged from one of my favourite evening bags( I was pretty sad when it broke!). I am finding that glass beads are an economical way to add a little more umph to my pages without breaking the bank. I have made my own stick pins as well as using them to decorate pages or embellishments. I hope to add more colours to my stash at some point in the future. Meanwhile, I am glad I finally pulled these out to play with.
  If you have something new to share or would like to pagerize Amanda's page, please pop over to Scrap Our Stash and drop us a note.

Tuesday, July 19, 2011

The Method Behind the Little Monsters

  I am in the process of training for a Marathon. It's not the kind you run. It's the kind you scrap. It's also known as the Mother LOAD. Over the next few weeks, we'll be training to scrap 26 pages over the course of 26 days. For those of you who don't know what LOAD stands for, it means LayOut A Day. Finding the time to make a scrapbook page every single day is quite the undertaking. I have completed two other LOAD's this year. During the first one, in February, I managed to create a page every day. For the second one, in May, I managed to make a lot of pages but did not get to scrap daily. I did learn a lot during both. The main thing being that letting go of perfection is fine. Just choose your photos and products and start scrapping. I have made a lot more pages since then. I find that I am loving more of my pages now that I have freed myself from making them perfect. After all, people are looking at your albums for the story, not your page composition.
 As part of the Mother Load, we were asked to go over our creative process. While creating pages this week, I realized that I have more than one process. I think this is a good thing, as it open me up to different means of inspiration. I thought I would share a couple of those creative methods with you today.
  The first page was inspired by an HTC phone ad that I saw while reading a magazine at the hair salon. It looked a lot like this one:    
                                                           
                                                     
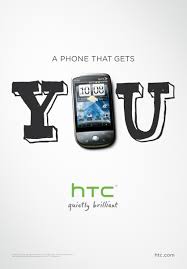
So I snapped a photo of it on my smart phone. What I liked most about it was how the phone made the letter O in the center of You. I wanted to do something like it on a page.I actually held onto it for awhile until I came across the right photos. I ended up using a photo and hand stitching to create the O in Monster's.
SEI papers and sticker
Basic Grey alphas
paper trunk Black alphas
colorbox black ink

This was one of those photos that I had been unsure what to do with. Sometimes ideas or thoughts sort of stew around for a bit in my head.The same went for the paper( no clue how to use it), but once I got the idea for the title, the page came together. By sticking with the SEI kit, I was able to quickly select papers and stickers to go on the page. Paint has become a go to medium for me. I can always get the colour I need versus spending time searching for the perfect Cardstock. In this case, the paint helped tone down the busy pattern. I used to hang onto elements like the sticker because I felt they had to be used a certain way as they were intended. Now, I have no fear about altering them. In this case, it was designed to be about one person. I just chose to cross over the word "is" and write in the word "are" so that I could include all of the kids' names. I also made an error on this page. I wrote the date incorrectly. While I was able to wipe it off, it left a smudge. I decided I was ok with it, since the page was a bit messy anyway.
 Sometimes photos inspire me. Other times, I see a sketch and instantly know what photo to use with it. I tend to print off a bunch of photos and I have them in my albums in the order I want the finished pages to be in. When I saw the Sketchy Thursday 7-14-11 sketch, I knew at once which photo I wanted to scrap. I had a second little monster themed photo.

Sei papers and puffy black alphas
Cosmo Cricket tiny type alphas
dmc floss
white acrylic paint
Sassafrass chipboard number
Sketchy Thursday's 7-14-11 sketch

Having made the prior page, it was easy to find and use the same supplies. In fact, I often tuck scraps from the first completed page into the album right along with the other photos. Then they are right there when I am ready to work on page two. Having the sketch right there meant it was easy to pull the elements I wanted for the page from the scraps. The title took a little more thought. often on the second page, I will not include a title or will make a subtitle. In this case, the title is part of the journaling which reads " I could hear them giggling. So I peaked under the bed and 6 eyes stared back at me." The white paint helps anchor the photo on the page along with the shelf created by the scraps and stitching. A visual triangle has been created with the orange monster, orange writing in the journaling, and the orange strip of paper under the title.
  I have a few other creative methods that inspire me to work. Most of the time it's a photo. Sometimes, it's a new product or a kit I made from shopping my stash. What allows me the most time to scrap is the way I arrange my photos. I think that's something I shall have to photograph and share in another blog post.

Wednesday, April 27, 2011

The Exciting Adventures of Raft Man and Noodle Boy

 Often times, many families have something they enjoy doing together. For us, that's playing in the pool. This also means we end up with photos of the same type of event over and over again. If you are like me ( Obsessed with photos of your family) this may make it hard to narrow down the best photos for scrapping. Often, I just like to scrap them regardless of how many pool layouts end up in my albums. After all, it's about enjoying the process of scrapbooking while telling a story, right? A title like this one helps set this group of photos apart from other similar photos. It makes for a more specific story and highlights the relationship between my husband and my son. I did not come up with the title. My silly son and husband did while they were playing in the pool. I was more than happy to "borrow" it for these pages.
Scraphappy.org February Sketch
SEI papers, chipboard and Alphas
Making Memories brads
Bic Mark It pen in midnight navy

  One would think with as many water themed pages as I make that I would have all of the perfect embellishments to complete a page. Sometimes though, I wish I had a little something different. When I was making the companion page for raft man and noodle boy, I wanted some waves. I don't have any wave stamps which for some reason is what I felt it needed. It's not in my budget to go buy stamps right now and quite frankly, if I did, I would have to order them on-line. I really didn't want to wait for them to be shipped to me. I will admit, that I almost caved and bought a stamp set from K and Co.

  Common sense grabbed a hold of me. Because the image I wanted was fairly simple, I decided to see if I could doodle a wave similar to the stamp I had wanted to purchase. I got a piece of scrap paper, and used a pencil to doodle some waves. I was happy with the overall results and then made the brave step to doodle it on my layout. If you feel less brave than I, try doodling on a scrap piece of paper, then cut it out and use that on your page.White erasers also come in handy. They don't seem to leave marks on your paper.I am not quite sure if the doodle goes well with the page, but I did enjoy the little experiment and plan to try it again in the future.
Sassy Lil Sketch April 7, 2011


If you have any sun themed/ fun in the sun type projects to share, there is still time to submit them to Scrap Our Stash for the April challenge.

Tuesday, April 26, 2011

Mad Libs...the Scrapbook version

 Mad libs are so much fun! I used them to help teach my son the parts of speech. What child wouldn't want to do school work when it's mad libs? So, when the chance came to play a scrappy version of the game I just could not resist trying it out. To play the scrappy version, you send in a list of paper colours, embellishments and a one word title. The hostess mixes up everyone's items and then sends a list back to you. I received the colours green, blue and purple. My embellishments were ribbon and brads. The title word was "happy". At first, I was very stumped. The colours seemed to me to be too strong if I used them as Jewel tones or too feminine if I used them in lighter tones. I began to flip through my papers searching for the right ones. I finally settled on K and Co.'s Poppyseed line. The colours were perfect and the hint of charcoal in them gave me the idea to use a Black and white photo.
K and Co. poppyseed papers
title and birds cut from K and CO. borders
Crate paper ribbon
all papers inked with SEI ink blue ink
Playful purple Bic Mark it
Basic Grey Brads
Scrapbook Challenges Sketch 250


  I love the results of the colour combo, so much that I made a second page. Stay tuned to see it later on.The base card stock is actually a little more white, but shows as a light purple in my photo. I love it when a hard challenge comes together in a good way. I often find I love the page because it's so different from what I usually make.

Saturday, March 5, 2011

Chances Are...

only what we make them. Some people look at life and see the negative. Others, find the positive. I think perspective gives us the ability to make our own happiness and luck. I try to see the good and have a positive outlook. I feel very lucky to have my husband and my son. Our life isn't always easy...but we are happy together. My husband often says we live a charmed life. I think that is true
    The song for this week at Scrapping to the music was perfect for this page. The lyrics brought to life some of the journaling I used to talk about the wonderful chance my husband had in his job.
SEI mimosa papers and stickers inked with SEI lime ink
Basic Grey brads
October Afternoon mini market alphas
Making memories greenhouse alphas
glossy accents
Let's Scrap Sketch 3-2-11

The photo is of the hotel in which my husband works. The number was the number of his office at the time of the photo. I chose SEI's mimosa line. It's usually hard for me to work with pink, because I am the only female in the house(other than my cat). I loved how the Mimosa papers matched the tropical feel of the hotel.

Be grateful for everyday and for what you have. Don't forget to make the most of your chances and to share those in your scrapbooks.

Sunday, January 23, 2011

I really didn't like that!

   That's what my son told me when he saw the pictures I had printed. They were photos of him and his Dad riding "Storm Force Accelatron" at Islands of Adventure. Both he and his Dad thought they would be getting on something akin to The Mad Hatter's tea cups at Walt Disney World. Let's just say this ride was not quite so tame.
   While they both were not fond of the ride, I am fond of the Layout I made about their experience. Since the ride was about Storm, from Marvel's X-men, I used white paint to create a tornado. To further the effect, I smeared and splattered Black Magic and Glacier glimmer mist, then drew swirls with a pencil. The fun, colorful polka dots of SEI's monsterville paper seemed the perfect complement to a theme park page. using a Kraft paper background softened some of the bright colors and busy action.


also submitted to Frosted Designs 1-21-11 challenge
 I made it a point the day we were there, to photograph the ride's sign so I could use it as a title. I fussy cut this out of the photo, along with Storm. I made Storm jump out from the page with some 3-d foam. I left part of the white boarder from the photo paper when I cropped down these wallet size photos for page two. it was a time saver and also helped me create separation between the busy blurred images. I wanted the photo of my husband and son exiting the ride to be set apart. So I mounted it on a chipboard block and added a transparency to it. The transparency said "you and me" on a small corner. I found these cloud and lightening shapes from American crafts Vinyl Teen to be perfect( prior to this page, I had no clue where I was going to use them! ). I used them to cover the word on the transparency and then as accents on the page. Green and black sequins add the finishing touches.

I completed this as the January Scraplift Challenge over at Sketches 4 all. My Fellow DT Stacy made this page for us to lift:
Made by Stacy Rodriguez

As you can see, mine changed quite a bit from the original. That's the beauty and the fun of scraplifting though. Maybe you should give it a shot...post your creation over at Sketches 4 all!                              


Saturday, September 25, 2010

Inspired by Children's Books

  I have always had a love of reading. I share that with my son. Even at the age of ten, he still enjoys our nightly reading...from novels to him now being the one to read to me. So, when Challenge Masters issued the week 4 challenge to scrap with a Favorite kid's book as your inspiration, it was a snap for me. The most difficult thing actually proved to be deciding which book to use, as I had several ideas.  I finally settled upon using " The Story of Ferdinand" by Munro Leaf.

The colors fit some of the ones in a set of photos about my son using a wheelchair. We had been at a science center, and he got to experience an obstacle course that a disabled person might have to navigate through on a daily basis. He learned a little empathy that day. When I think of the character of Ferdinand, I think of him as stoic, strong in himself, yet gentle and full of compassion. So the book seemed like a good fit.

I chose to use the colors from the cover and to add floral designs to the page. I used SEI's black orchid paper along with Pink Paislee 365 degrees on a Bazzill cardstock background. I chose to ink the photos and the papers in Colorbox black ink to help them stand out. I used basic grey stamps in White Frost ink to mimic the look of the white flowers on the cover. A few sequins added a fun tough to the page. To make the title match, I selected some CM stickers on which I used a Martha Stewart opaque chalk pen to add a white design. I then used some glossy accents on the stickers to add dimension.

The end result, IMO, makes the photos pop and have more meaning. I have a few other kid's books I think I may use in the near future. It was certainly a fun challenge that brought more meaning into the page than might have otherwise been there.

***Update: this project was highlighted as a top 3 pick at Frosted designs!

Thursday, September 2, 2010

Scrap Our Stash Border Challenge: Take Off Your Guard!

  Recently , I participated in Big Picture Scrapbooking's Big Idea Festival. I loved a lot of the projects, however, many of the supplies are just not available to me where I live. So what's a girl to do? Adapt, that's what. Make the design your own. so that's just what I did. I loved the look of Lisa day's bonus project and set out to use it with a series of photos about Junk-a-noo. What is Junk-a-noo you ask? It's a Bahamian tradition...sort of like Mardi gras or Carnivale. It occurs every year around July 10th (Bahamian Independence day) and around Christmas. Unfortunately, we have never been. It occurs in the middle of the night and literally runs past dawn. While we have never attended, we do see many of the costumes and float decorations around the island. I snapped some photos of my son with those decorations and decided they would make a fun page. I took inspiration from the bold colors of junk-a-noo and from the costumes. I chose the pinks and yellow oranges to draw from the colors in the photos. The turquoise was a nice contrast. I chose the sequins and pearls b/c they reminded me of the all of the shiny glitz of the costumes. The gold paper strip and the glittery Pink Paislee Letters further added to the glitz.


  Lisa's design is pretty evident in mine. I varied it by splashing some tiger lily and patina glimmer mist onto the background cardstock. I used some Crate Paper chipboard elements from the pink plum collection. Pages like these are a great way to slip in some girl colors without making the page look to feminine. I used some fussy cut elements from SEI's jocelyn collection to make the rosette's/round flowers and the border strip on the bottom. I cut strips of PP to make the scalloped border for the rosettes/flowers.


If you are like me, you may not have a lot of border punches. I simply don't have the storage space or the budget for them. In fact, I own only 2: an ancient fiskar's punch and an EK success notebook punch. So how did I make the border scalloped? A while back I saw this tip in creating Keepsakes and decided to try it...I took the guard off of my corner rounder, and then used it to punch down a strip of paper...which created a scalloped border.


Once you have the border punched, you can easily make it fit around a circle. This will work with any punch or strip of paper and is especially handy for heavier papers that are difficult to fold and pleat. Cut small slits in even increments along the strip. In my case, I chose every 2 scallops. Just be careful not to cut too far into the strip, or it may rip.

I chose to use glue dots to adhere the strip to the flower that I had fussycut. As you adhere each section, you can carefully bend and then slide the next section under the other.


This effectively produces a rounded edge with the strip.


I really enjoy the fun look to this page with the rounded borders. This could easily be done with a straight strip of paper or with most border punch designs.

The borders along the sides of the photos are made with Pink paislee artisan tape. I simply folded it as Lisa had in her design and I hand Stitched over it .

For more inspiration, don't forget to check out Scrap Our Stash. This month's challenge focuses on border punches. Let's see how you use yours!

Tuesday, May 11, 2010

Another sketchy Thursday challenge-determined for Victory

  So here I am again...I love these sketches. I can see the sketch and can visualize the photos and the pp. Suddenly, I'm off and the Lo comes together. Seems easy...though there are often hitches along the way. I saw the sketch for this week and visualized using my  Black orchid pad...that lovely set with all of those great paper patterns...which has been sitting unused for months waiting for the right photos. In 5 minutes flat, I had cut the PP and laid it out on the cardstock. Excited that it was going so fast, I then hit the first bump in the road. I had these great brads with letters from my stash. It would seem though that I lacked enough e's. I really wanted to title the Lo " Determined for Success" but after playing around with the thesaurus and the available letters( because I was determined to use them) I settled on "Determined for Victory." *It's a little hard to read them because the camera won't pick them up.

  So I am off and running again now. I decided to use this Lo as part of a journaling assignment for the Textuality class I am taking at Big Picture Scrapbooking. Here comes hitch 2... I played for an hour with the word processor trying to make the journaling "just so." In the end, I called it quits...deciding I liked what I had. So as usual, a fast Lo quickly turns into several hours of tweaking.

Ahh, the Lo...I made this about my son being determined to blow up a balloon and tie it. My husband had done one, so he figured he could. DS literally tried for hours! This from the Sketchy Thursday 5-6 Challenge. BTW, the font used is CK boutique and as mentioned above, the pp is SEI Black orchid, the letter brads are unknown.
And so, without further ado, the grand reveal:


And as usual, I made a 2 page lo: