Showing posts with label Crafting with Teens. Show all posts

Friday, September 4, 2015

Altered Paper Mache Animal Collaberation Blog Hop


It's time to welcome September and what better way to do so than with a creative project! A few months back, I mentioned on the DigiScrap Geek Podcast that I was part of a collaborative mixed media project. I joined some friends and acquaintances in a commitment to create a paper mache animal. It's finally time to share what we made!

I was pretty excited that my son chose to join in the project as well. It's been a while since I have gotten to do any crafting with my teen. We started by looking around Pinterest for  a few ideas. I finally settled on a cat and my son chose a fennec fox. 

We cobbled our animals together from plastic cups, duct tape, cardboard and tin foil. These bits of left over "trash" made a nice skeleton for our animals. We chose to use paper clay instead of a traditional paper mache. It is very humid in the Bahamas and the paper clay has a reputation for being fast drying whereas traditional paper mache may take weeks to dry fully here.We were very happy with the results though the paper clay ended up being a little rougher than we expected.

Because of the rough surface, we opted to use spray paint as our base coat. Initially, we chose acrylic paint to decorate the animals with, however, we quickly switched to chalk markers. We had a little more control with the chalk markers and they were fast drying. They also allow for coverage over darker surfaces( in most cases not even needed a second coat).

My son chose a navy base coat for his fennec fox. He then used both silver and gold to spray sections of the fox, in some cases using a stencil. 


The rough surface made it harder to draw on the animal, so he opted for a more primitive tribal look.


I chose a gold spray paint as the base for my cat. The coat was rough but nearly as rough as my son's animal. I was able to lay down a stencil in a few spots and to spray some of the navy paint to allow the design to show through.I also drew some hearts and used the stencil to give my cat a sort of crown.


Not all of the stencil was crisp, given that the surface of the cat was curved. I used a chalk marker to outline small sections of it.

My son and I had a great time making our animals together and I am truly hoping to work on future collaborations. I have wanted to to more mixed media projects in the past, but I never seemed to find the time. Joining the collaboration gave me a bit of accountability while still allowing me to enjoy creative freedom.

You can see other animals from the Altered Paper Mache Animal Collaberation by hopping from blog to blog. There isn't a specific order to hop in. You're free to hop around and enjoy at out own whim.


Affiliate links when possible. Thank you for supporting MSE.


Thursday, April 17, 2014

Crafting with Teens: An Easter Nest

I had the intention of crafting with my son during the Thanksgiving and Christmas Holiday breaks from school. It didn't work out as I had planned. So many of his friends were off from school as well and I found that he wanted to spend a lot of time with them. It doesn't bother me. We see a lot of each other during our homeschool sessions. Time with his friends isn't always easy to come by since some are homeschooled and some go to different public schools. So I let that time take precedence.

What I changed this time was when we do the crafts. I set aside time when I knew his friends would be busy with homework to make our Easter craft for this year.

The craft is a simple nest. It's composed of a tart tin, a few plastic eggs and some feathers. I helped my son crimp some of my scrapbook paper scraps to line the nest. We used some of the new Jenni Bowlin Scattered Stars Rub-ons to dress up the plastic eggs just a bit. It was quick and easy plus I had the added bonus of just sitting and chatting with my son while we worked.


Supply Options


View blog post for supplies


Enhanced by Zemanta

Tuesday, November 5, 2013

Crafting with Teens: Halloween, Part 2

I realized that I neglected to post our second Halloween project. I must confess that we are still working on the third. When working with kids, no matter the age, it's so important to let go and just let them have creative license over the whole project. My notion of the finished project was much different than my son's finished concept.

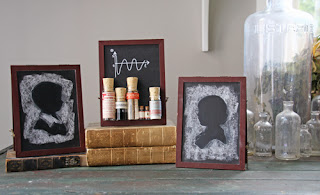
This is what the kit looks like,if completed per directions. It's available at JBS Mercantile.  The directions are super easy to follow and allow for you to personalize the finished project a bit.


This is my son with the completed project. Note that the two easels with silhouettes are not present. As cool as I thought the silhouettes were, he just wasn't that into them. The science themed vials were a big hit with the whole family though. My husband thought they were especially unique and pretty cool. It's definitely not your standard big box Halloween decor item!


We spent some time debating over what to do with the other two easels. In the end, we decided that we would use one for a Thanksgiving themed easel and another as a Christmas easel. The caveat is that my son wants to use some of my precious scrapbook supplies. It's going to be hard to share, but I think I have plenty of stuff to spare. How about you? Is it easy for you to share your supplies with your kids?


Enhanced by Zemanta

Wednesday, October 23, 2013

Crafting with Teens: Halloween,Part 1

The truth is pretty obvious. My son is getting older. So now what? We have an annual tradition of making a craft for all of the big holidays. I have been struggling to find the right one. He is still willing to sit down and craft with me, but the usual crafts just don't capture his interest.

After poking around a bit, an idea dawned on me. I have been trying to get my son interested in mixed media. He loves to draw but has also been looking for another outlet for his creative energy. So far, he hasn't been interested in mixed media at all, but I think the no rules concepts of this art form are perfect for a teen.There are a few mixed media style Halloween kits available right now. I decided to show K the options, leaving the choice up to him. After all, at the end of the day, I don't want to push too hard. We browse a few websites and I can see his face light up with a bit of enthusiasm. Maybe getting older doesn't have to mean he will lose some of the excitement and magic of Halloween and Christmas after all.

His first choice is a kit from JBS Mercantile. K is drawn to the little vials and vintage labels of Halloween Decor Easel. The kit looks more sophisticated than a standard Halloween craft and it's quite unique. I admit to loving his choice.


My son's second choice is to make some Halloween houses with my Frog Dog studio Mixed Media kit. I guess I will have to let go a bit with this one. I had plans of my own for those houses, but time spent with K is far more important.


The first kit to arrive is the Frog Dog Studio kit. This sort of predetermined what we would make first. K had an assignment for history class. So he decided to borrow the sugar skull stencil and to snag the big canvas from the kit. The result is his first Mixed Media canvas. For his assignment, he had to design his own pirate flag. We decided the flag can double as a Halloween decoration.


The Halloween houses are currently in a state if being assembled. K has been playing with the Lindy's stamp gang mists to create a background. It's a little hard for me to let go of my supplies sometimes, but at the same time, I love seeing what he creates. I learn so much by just watching him explore each medium.

The Easel kit arrived from JBS Mercantile on Monday. I guess the good thing about these projects is that we can have several going at once. While one dries, we can work on another. We're intermixing the work between our homeschool classes which makes for a more relaxed day of work. I think also, that K has found a love for working with mixed media a canvases. We'll see if he produces more in the future.

I'll be sharing our Halloween crafts here on the blog. Stay tuned to see our next completed project.


Enhanced by Zemanta